There have been major changes in how search engines operate that should question our traditional take on SEO:
- Research keywords.
- Write content.
- Build links.
Nowadays, search engines are able to match pages even if the keywords are not present. They are also getting better at directly answering questions.
At the same time, searchers are growing more comfortable using natural language queries. I’ve even found growing evidence where new sites are ranking for competitive terms without building links.
Recent research from Google even questions a fundamental content marketing framework: the buyer’s journey.
Their conclusion is that we should no longer consider visitors moving on a linear path from awareness to decision. We should adapt to unique paths taken by each potential customer.
Considering all these major changes taking place, how do we adapt?
Using machine learning, of course!
Automate everything: Machine learning can help you understand and predict intent in ways that simply aren’t possible manually.
In this article, you will learn to do just that.
This is such an important topic that I will depart from my intense coding sessions in past articles. I will keep it light on Python code to make it practical to the whole SEO community.
Here is our plan of action:
- We will learn how to classify text using deep learning and without writing code.
- We will practice by building a classification model trained in news articles from the BBC.
- We will test the model on news headlines we will scrape from Google Trends.
- We will build a similar model but we will train it on a different dataset with questions grouped by their intention.
- We will use Google Data Studio to pull potential questions from Google Search Console.
- We will use the model to classify the questions we export from Data Studio.
- We will group the questions by their intention and extract actionable insights we can use to prioritize content development efforts.
- We will go over the underlying concepts that make this possible: word vectors, embeddings, and encoders/decoders.
- We will build a sophisticated model that can parse not just intent but also specific actions like the ones you give to Siri and Alexa.
- Finally, I’ll share some resources to learn more.
Uber Ludwig
Completing the plan I described above using deep learning generally requires writing advanced Python code.
Fortunately, Uber released a super valuable tool called Ludwig that makes it possible to build and use predictive models with incredible ease.
We will run Ludwig from within Google Colaboratory in order to use their free GPU runtime.
Training deep learning models without using GPUs can be the difference between waiting a few minutes to waiting hours.
Automated Text Classification
In order to build predictive models, we need relevant labeled data and model definitions.
Let’s practice with a simple text classification model straight from the Ludwig examples.
We are going to use a labeled dataset of BBC articles organized by category. This article should give you a sense of the level of coding we won’t have to do because we are using Ludwig.
Setting up Ludwig
Google Colab comes with tensorflow 1.12. Let’s make sure we use the right version expected by Ludwig and also that it supports GPU runtime.
Under the Runtime menu item, select Python 3 and GPU.
!pip install tensorflow-gpu==1.13.1
!pip install ludwig
Prepare the Dataset for Training
Download the BBC labeled dataset.
!gsutil cp gs://dataset-uploader/bbc/bbc-text.csv .
Let’s create a model definition. We will use the first one from the examples.
Run Ludwig to Build & Evaluate the Model
!ludwig experiment \
--data_csv bbc-text.csv\
--model_definition_file model_definition.yaml
When you review Ludwig’s output, you will find that it saves you from performing tasks you’d otherwise needed to perform manually. For example, it automatically split the dataset into training, development and testing datasets.
Training set: 1556
Validation set: 215
Test set: 454
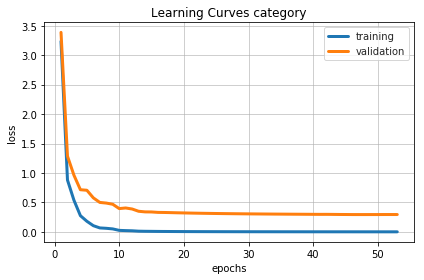
Our training step stopped after 12 epochs. This Quora answer provides a good explanation of epochs, batches, and iterations.
Our test accuracy was only 0.70, which pales in comparison to the 0.96 achieved manually in the referenced article.
Nevertheless, this is very promising because we didn’t need any deep learning expertise and it took only a small fraction of the work. I’ll provide some direction on how to improve models in the resources section.
Visualizing the Training Process
Let’s Test the Model with New Data
Let’s use this JavaScript snippet to scrape Google Trends articles titles to feed into the model.
After creating a pandas dataframe with the articles’ titles, we can proceed to get predictions from the trained model.
Here is what the predictions look like for the top global category.

I scraped headlines from the Tech and Business sections and while the Tech section predictions were not particularly good, the Business ones showed more promise.

I’d say that the DOJ going after Google is definitely not Entertainment. Not for Google for sure!
Automated Question Classification
We are going to use the exact same process and model, but on a different dataset which will enable us to do something more powerful: learn to classify questions by their intention.
After you log in to Kaggle and download the dataset, you can use the code to load it to a dataframe in Colab.
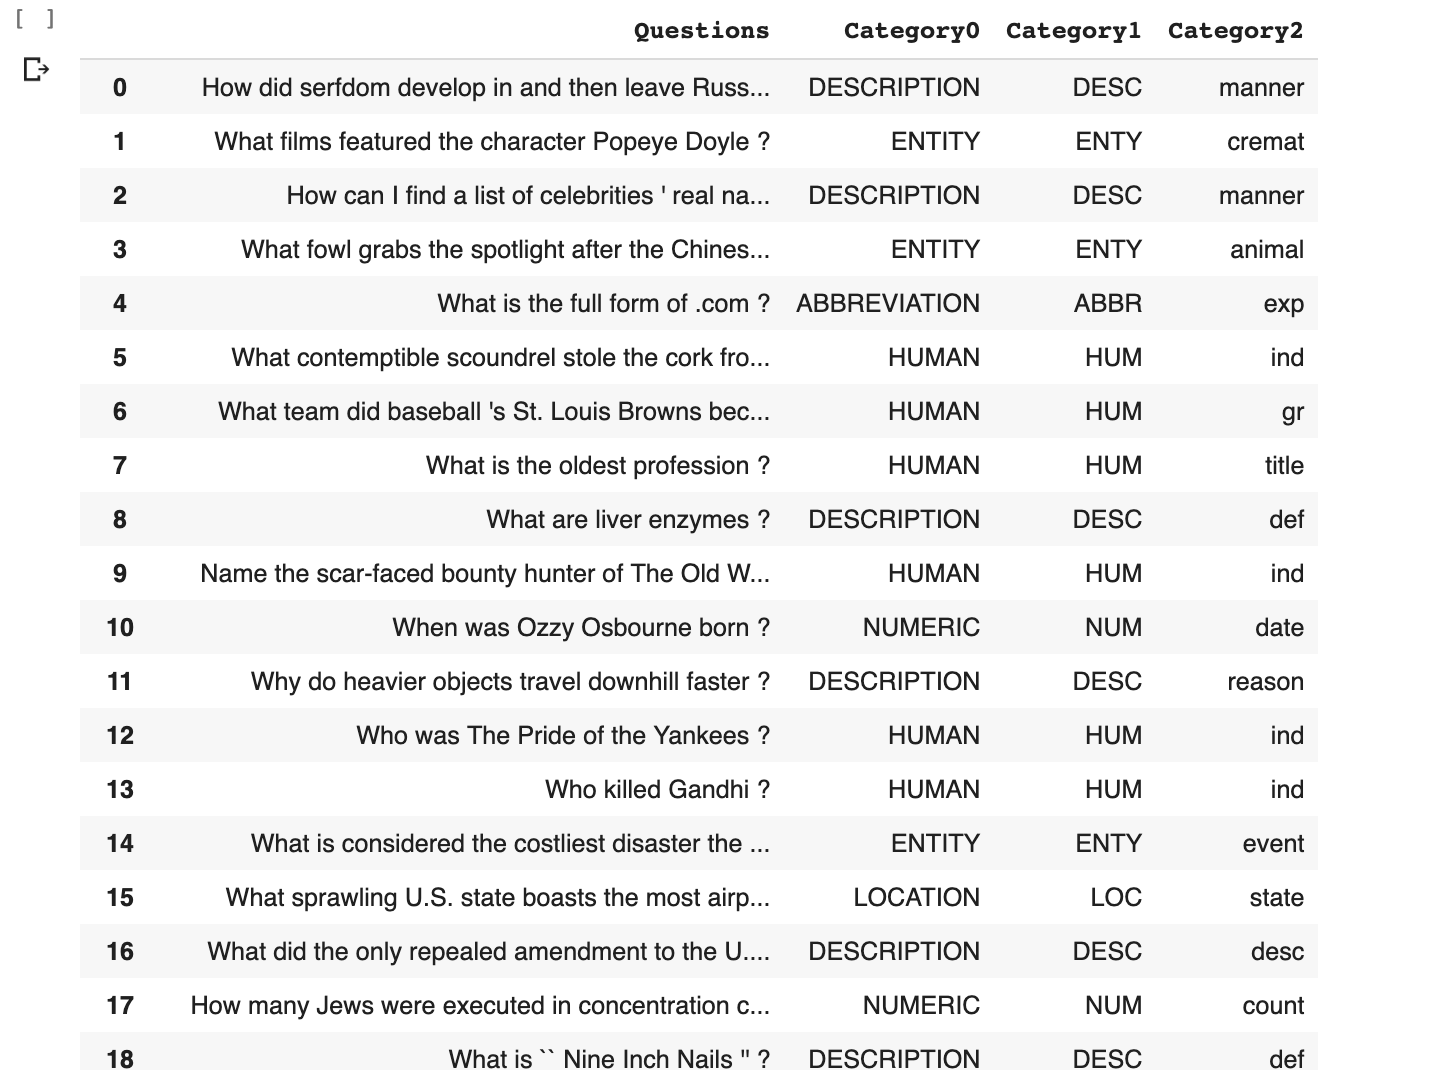
This awesome dataset groups questions by the type of expected answers using two categories a broader and more specific one.
I updated the model definition by adding a new output category, so we now have two predictions.
The training process is the same. I only changed the source dataset.
!ludwig experiment \
--data_csv Question_Classification_Dataset.csv\
--model_definition_file model_definition.yaml
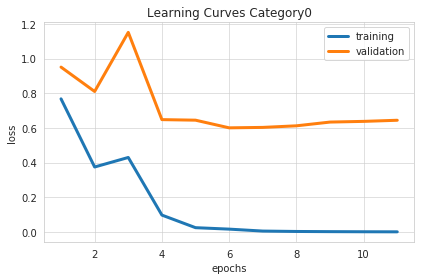
When we review the training output, we see that each category is trained separately, and evaluated separately and combined.
The training stops at epoch 14, and we get a combined test accuracy of 0.66. Not great, but also not completely terrible given the small amount of effort we put into it.
Let’s Test the Model with Google Search Console Data
I put together a Google Data Studio report that you can clone to extract long search queries from Google Search Console. In my experience, those are generally questions.

I created a new field with a little trick to count words. I remove words and count the spaces. Then I created a filter to exclude phrases with less than 6 words. Feel free to update to reflect your client site’s data.
Export the search console data by clicking on the three dots on the top right end of the report in VIEW mode. Upload it to Google Colab using the same code I shared above.
We can get the predictions using this code
This is what they look like.
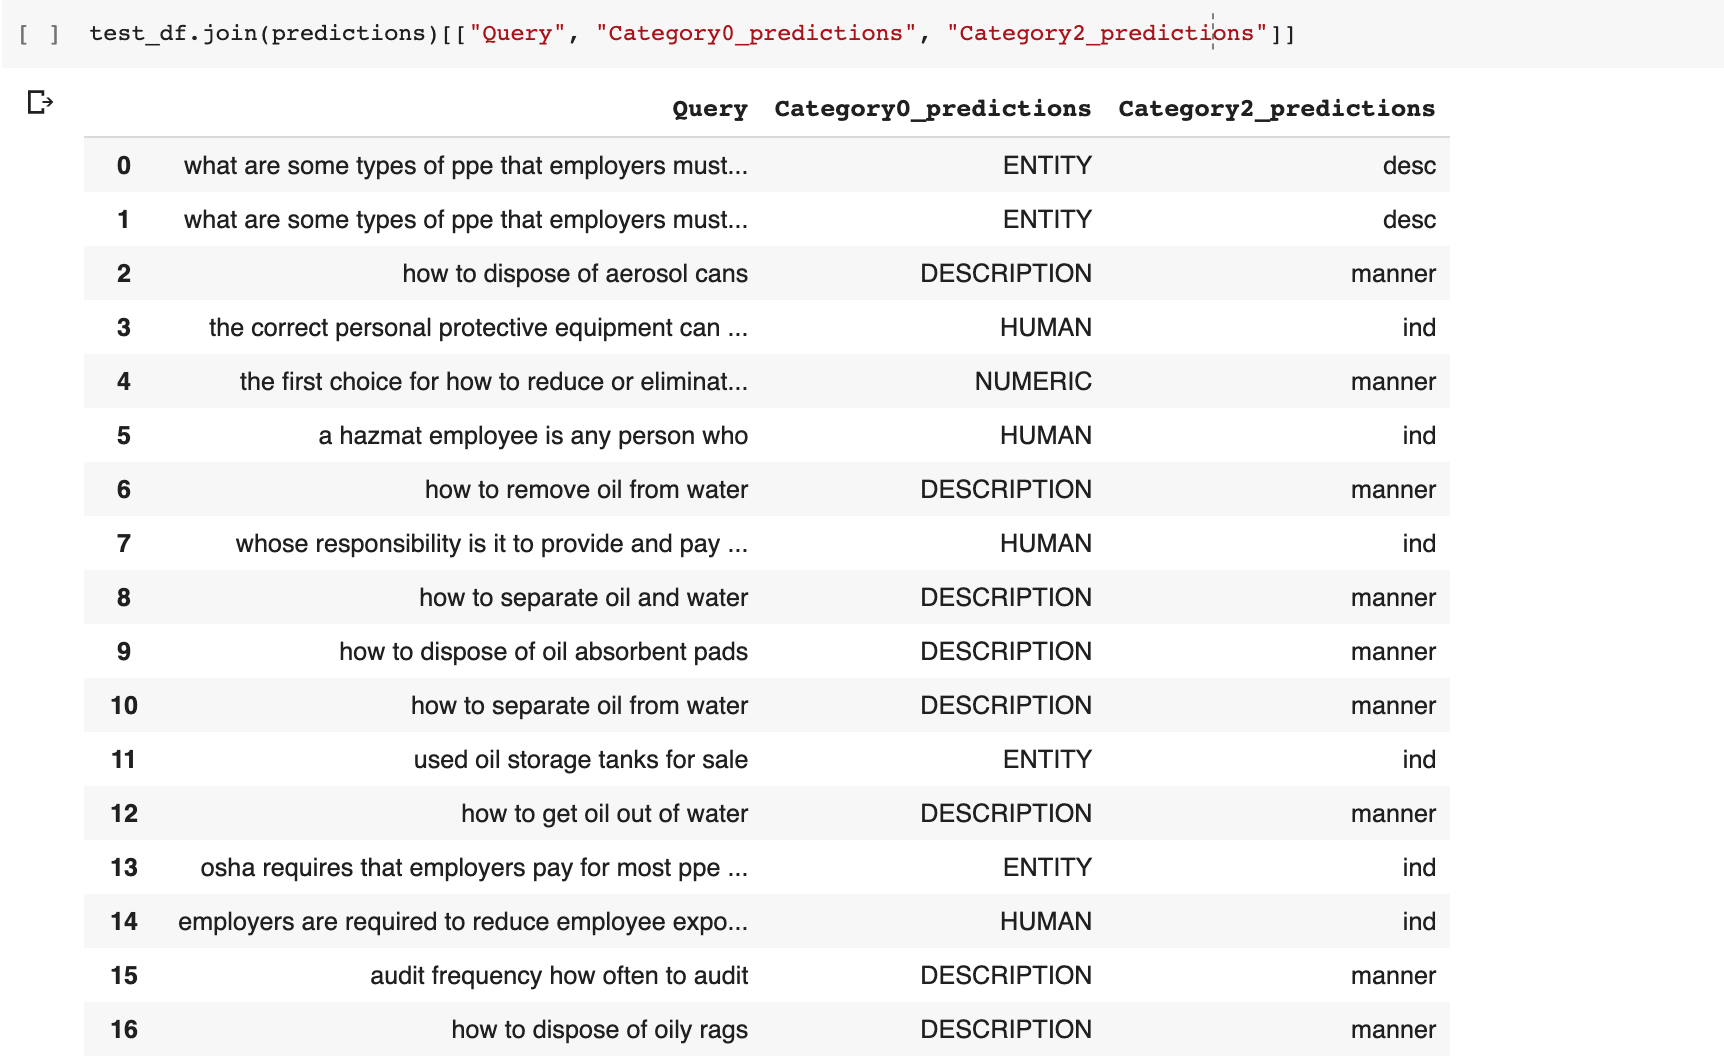
In my dataset, we classified the intent of 2656 queries we pulled from Google Search Console. Pretty amazing considering the effort.
There is a lot of room to improve the accuracy by tweaking the model definition and increasing the quantity and quality of the training data. That is where you generally spend most of the time in deep learning projects.
Actionable Insights
As we also pulled clicks and search impressions data from search console, we can group thousands of keywords by their predicted categories while summing up their impressions and clicks.
We want to find question groups with high search impressions but low clicks. This will help prioritize content development efforts.
test_df.join(predictions)[["Query", "Category0_predictions", "Clicks", "Impressions"]].groupby("Category0_predictions").sum()

For example, we can see a lot of search demand for entities (32795), but few clicks (518).
I’ll leave grouping clicks and impressions by the second, more granular, category as an exercise for the reader.
Understanding Natural Language Processing
I’m going to use a very simple analogy to explain how natural language processing (NLP) works when you use deep learning.

In my TechSEO Boost talk last year, I explained how deep learning works by using the illustration above.
Raw data (an image in the example above) is encoded into a latent space and then the latent space representation is decoded into the expected transformation, which is also raw data.
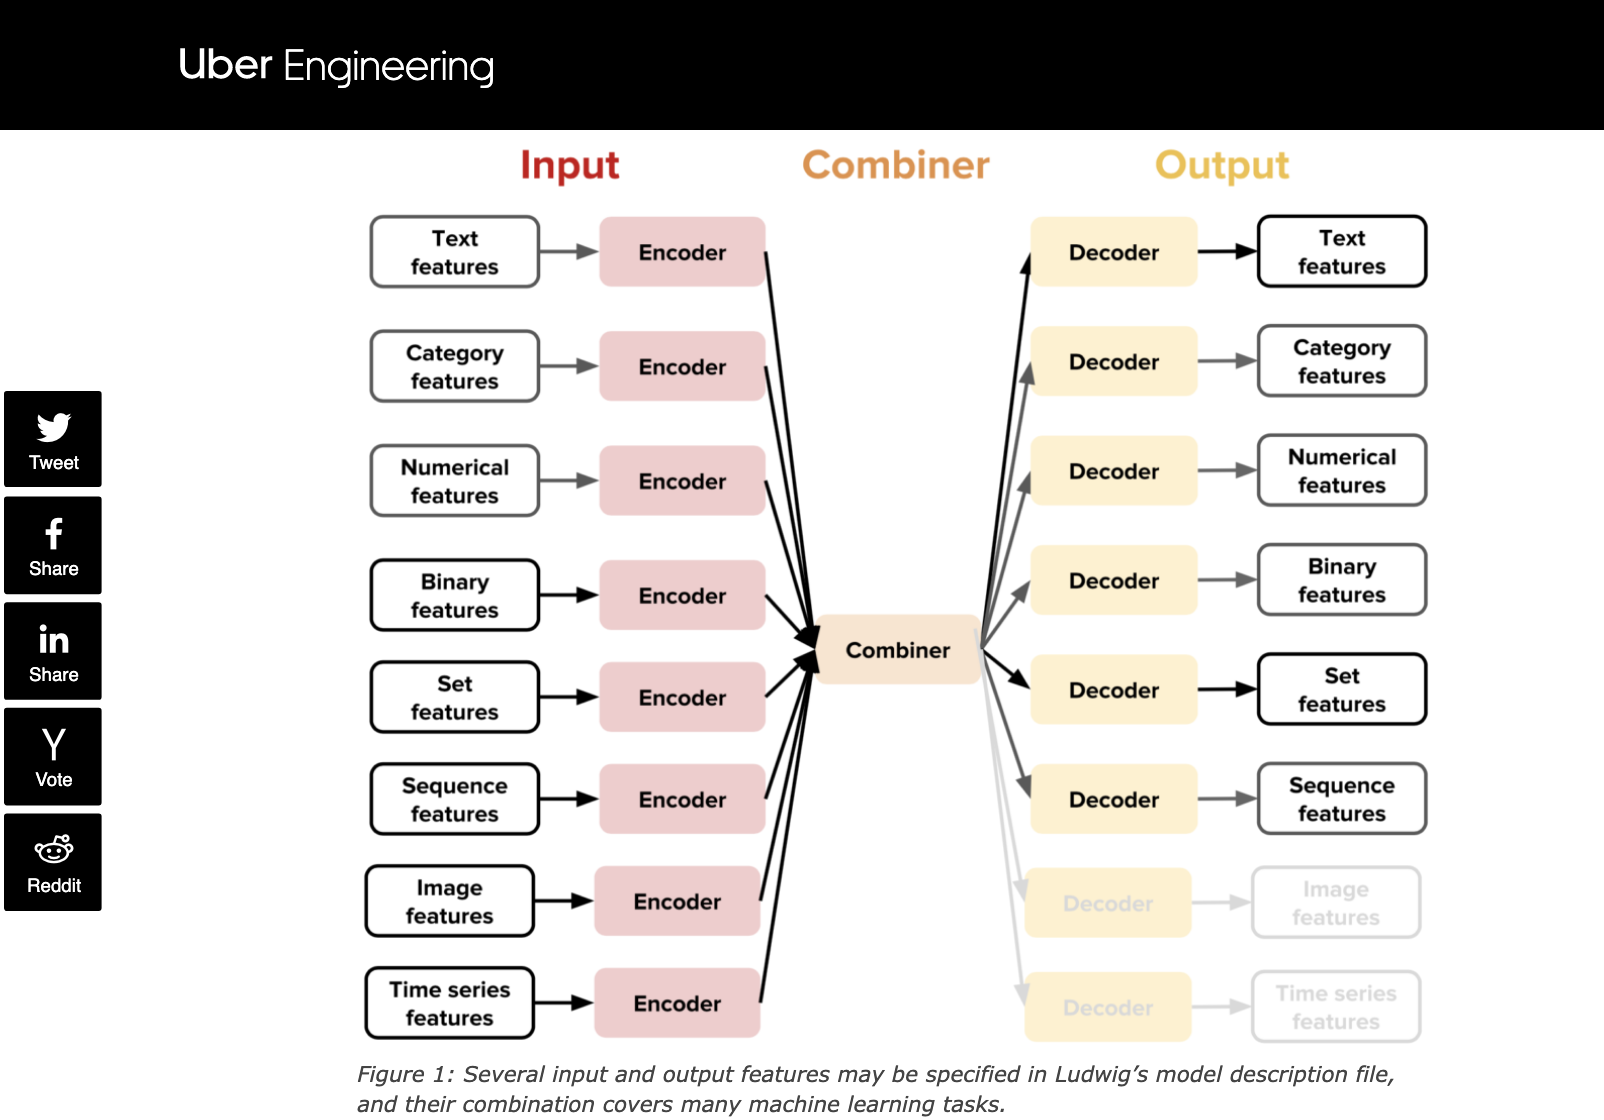
Uber uses a similar diagram when explaining how Ludwig works.
In order to train a model to classify text or questions, we first need to encode the words into vectors, more specifically word embeddings.
These are very important concepts that all SEOs must understand, so let’s use an analogy to illustrate this: physical address and the GPS system.
There’s a big difference between knowing the name of something and knowing something. pic.twitter.com/Z6v6Arwy5x
— Richard Feynman (@ProfFeynman) May 18, 2019
There is a big difference between looking up a business by its name in the physical world, and looking it up by its address or GPS coordinate.
Looking up a business by its name is the equivalent of matching up searches and pages by the keywords in their content.
Google’s physical address in NYC is 111 Eighth Avenue. In Spanish, it is 111 octava avenida. In Japanese 111番街. If you are close by, you would refer to it in terms of the number of blocks and turns. You get the idea.
In other words, it is the same place, but when asked for directions, different people would refer to this place in different ways, according to their particular context.
The same thing happens when people refer to the same thing in many different ways. Computers need a universal way to refer to things that are context independent.
Word vectors represent words as numbers. You normally take all the unique words in the source text and build a dictionary where each word gets a number.
For example, this is the equivalent of taking all business names in Eighth Avenue and translating them into their street number, the Pad Thai Noodle Lounge is number 114 on Eighth.
This initial step is good to be able to uniquely identify words or street addresses, but not enough to easily calculate distances between addresses globally and providing directions. We need to also encode proximity information using absolute coordinates.
When it comes to physical addresses that is what GPS coordinates do. Google’s address in NYC has GPS coordinates 40°44′29″N 74°0′11″W, while the Pad Thai Noodle Lounge has 40°44′27″N 74°0′5″W, which are in close proximity.
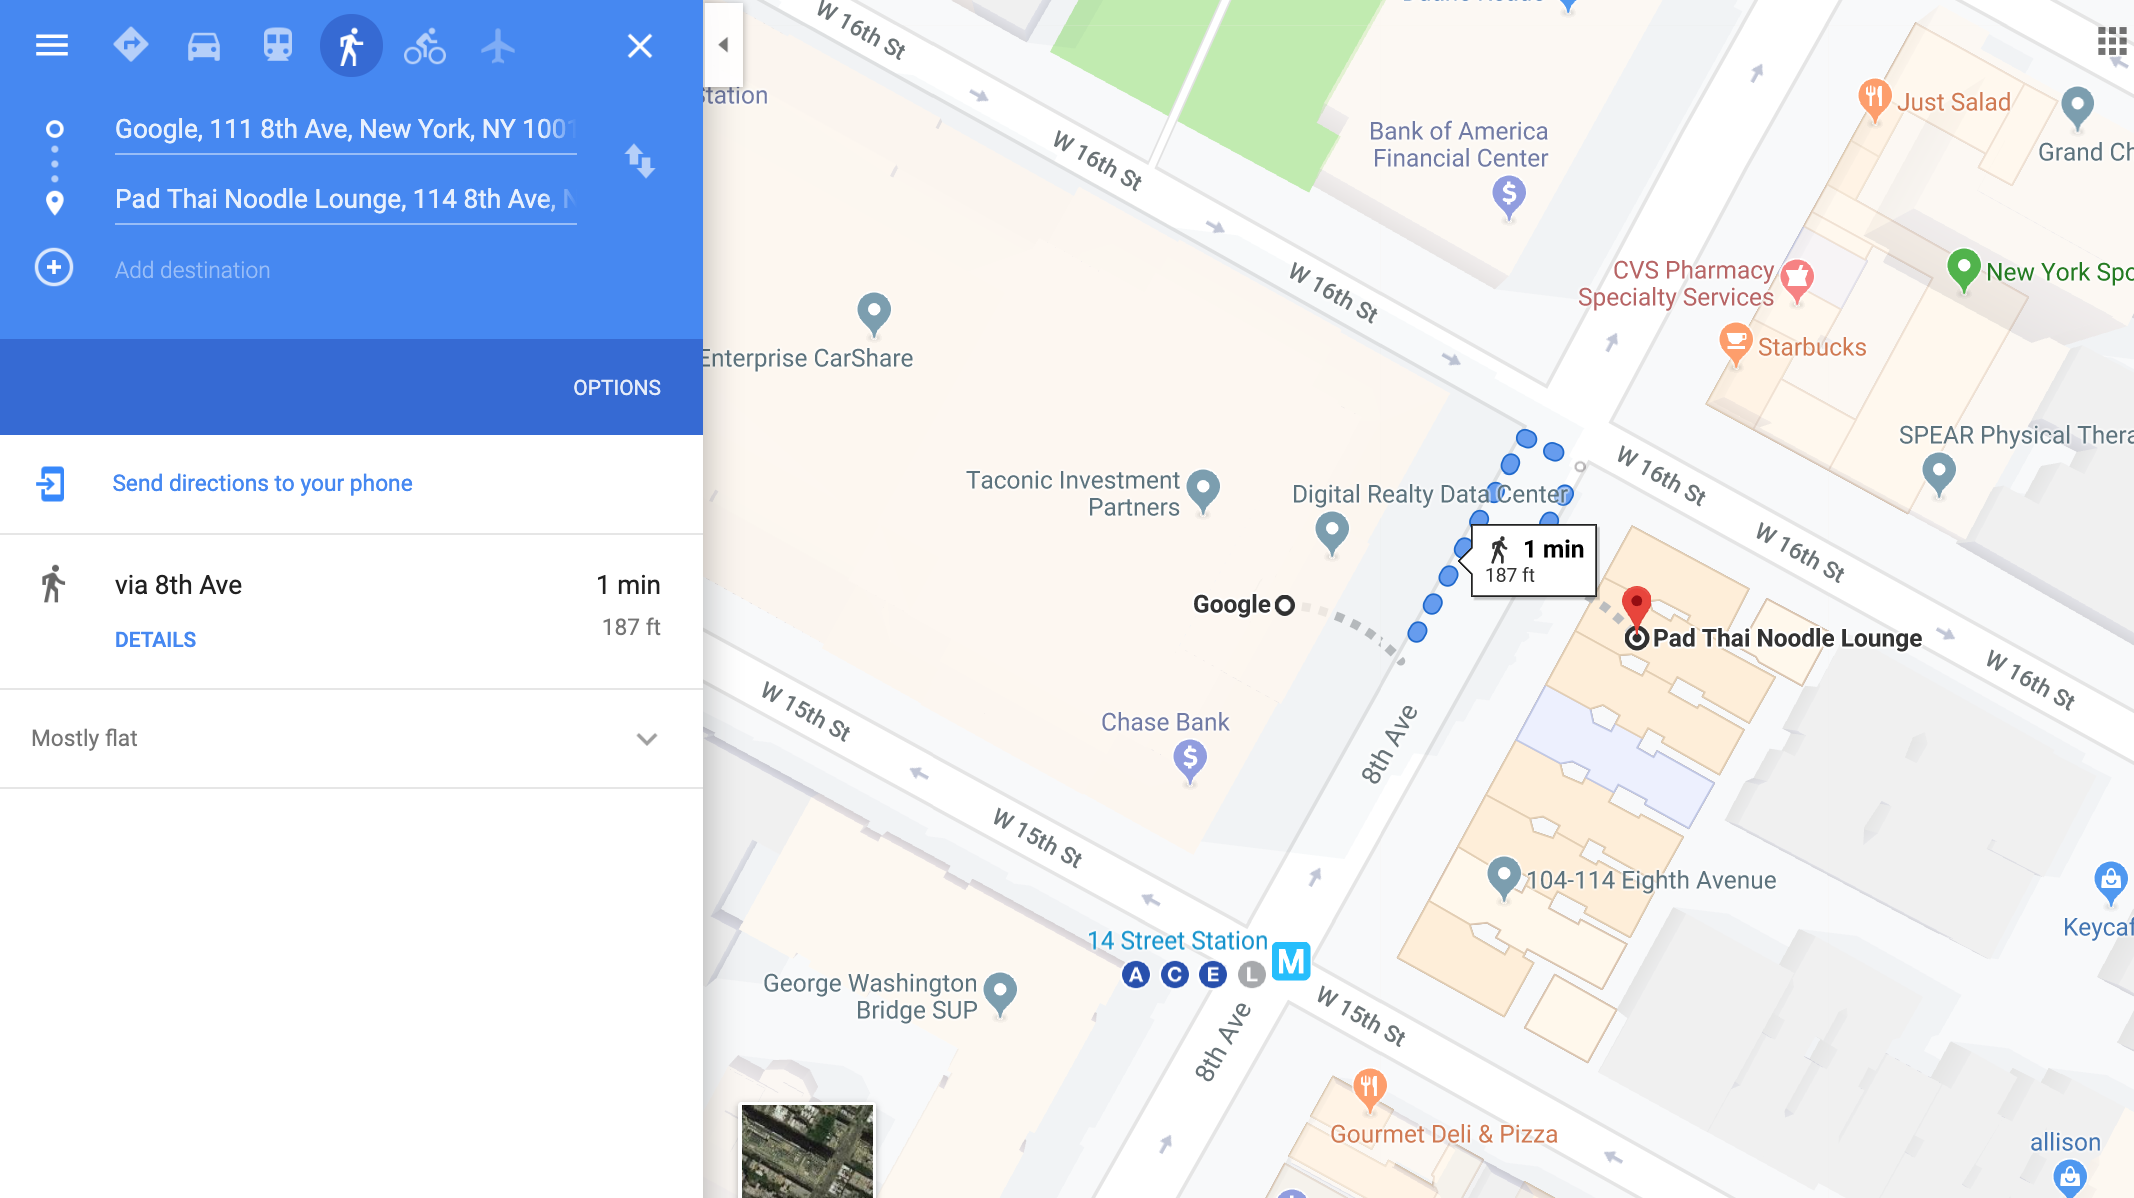
Similarly, when it comes to words, that is what word embeddings do. Embeddings are essentially absolute coordinates, but with hundreds of dimensions.
Imagine word embeddings as GPS coordinates in an imaginary space where similar words are close together and different ones are far apart.
As word embeddings and GPS coordinates are simply vectors, which are just numbers with more than one dimension, they can be operated like regular numbers (scalars).
In the same way, you can calculate the difference between two numbers by subtracting them, you can also calculate the difference between two vectors (their distance) using mathematical operations. The most common are:
- The euclidean distance.
- The cosine similarity.
Let’s bring this home, and see how word vectors and embeddings actually look in practice and how they make it easy to compare similar words.
This is the vector representation of the word “hotel”.
This is how this vector approach makes it easy to compare similar words.
So, in summary, when we provided the training text to Ludwig, Ludwig encoded the words into vectors/embeddings, in a way that makes it easy to compute their distance/similarity.
In practice, embeddings are precomputed and stored in lookup tables which help speed up the training process.
Beyond Intent Classification
Now, let’s do something a bit more ambitious. Let’s build a model that can parse text and extract actions and any information needed to complete the actions.
For example: “Book a flight at 7 pm to London”, should not just understand that the intent is to book a flight, but also the departure time and departure city.
Ludwig includes one example of this type of model under the Natural Language Understanding section.
We are going to use this labeled dataset which is specific to the Travel industry. After you log in to Kaggle and download it, you can upload it to Colab as done in previous examples.
It is a zip file, so you need to unzip it.
!unzip atis-dataset-clean.zip
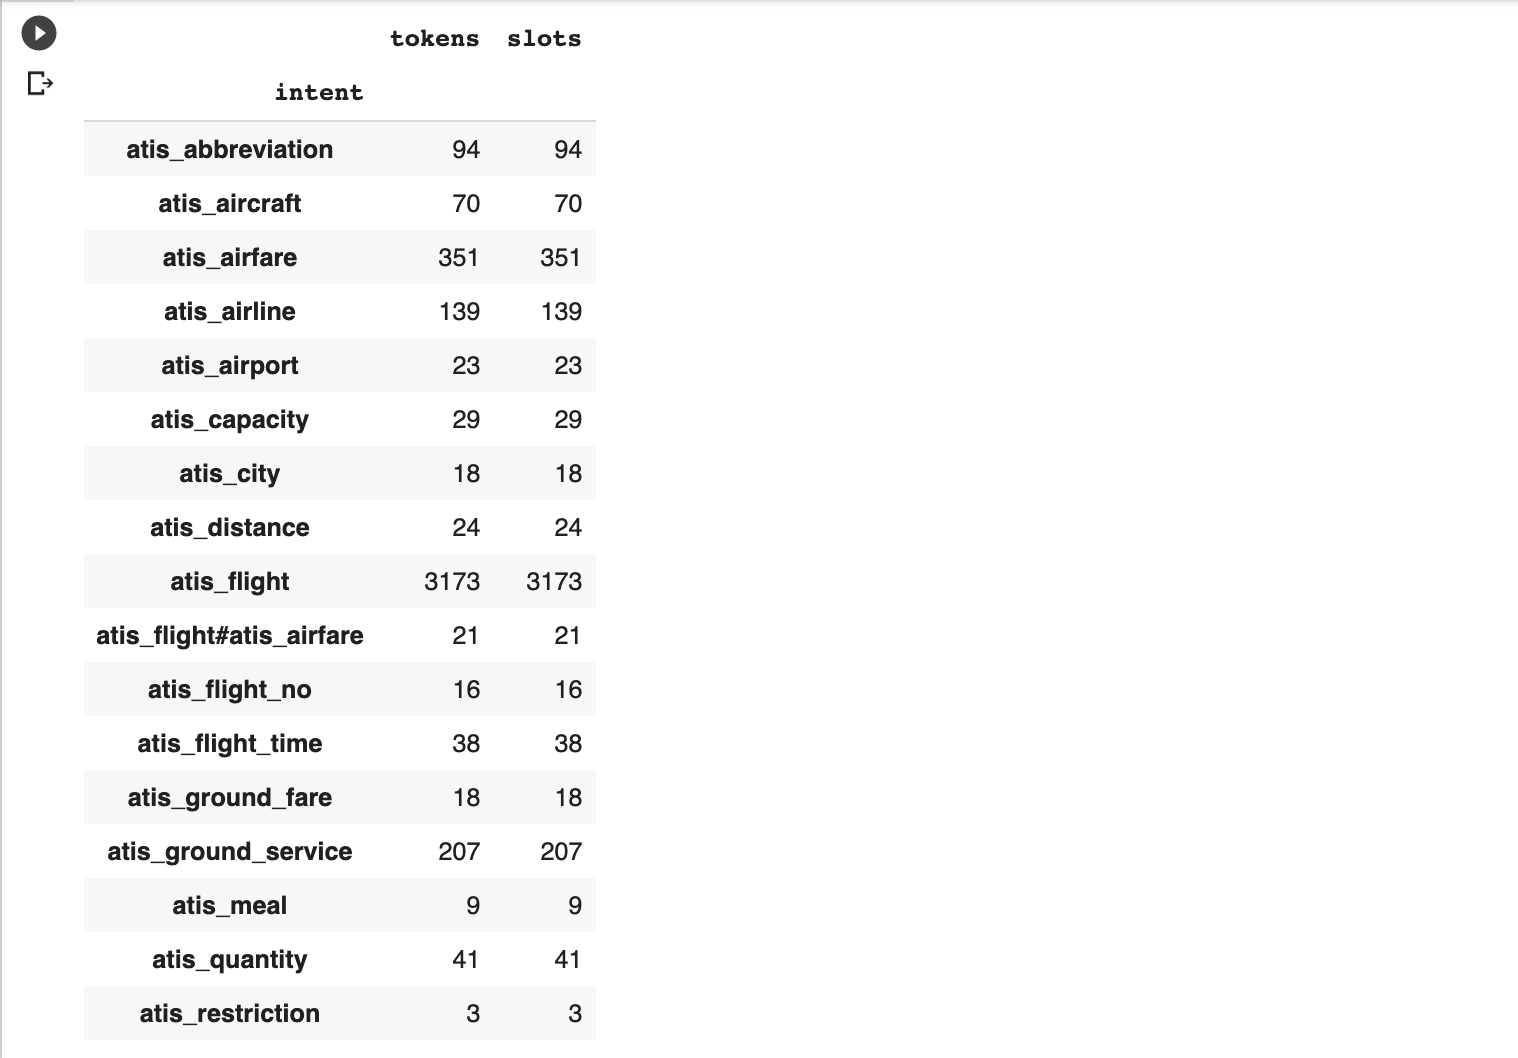
Here is the model definition.
We run Ludwig to train the model as usual.
!ludwig experiment \
--data_csv atis.train.csv \
--model_definition_file model_definition.yaml
In my run, it stopped after epoch 20 and achieved a combined test accuracy of 0.74.
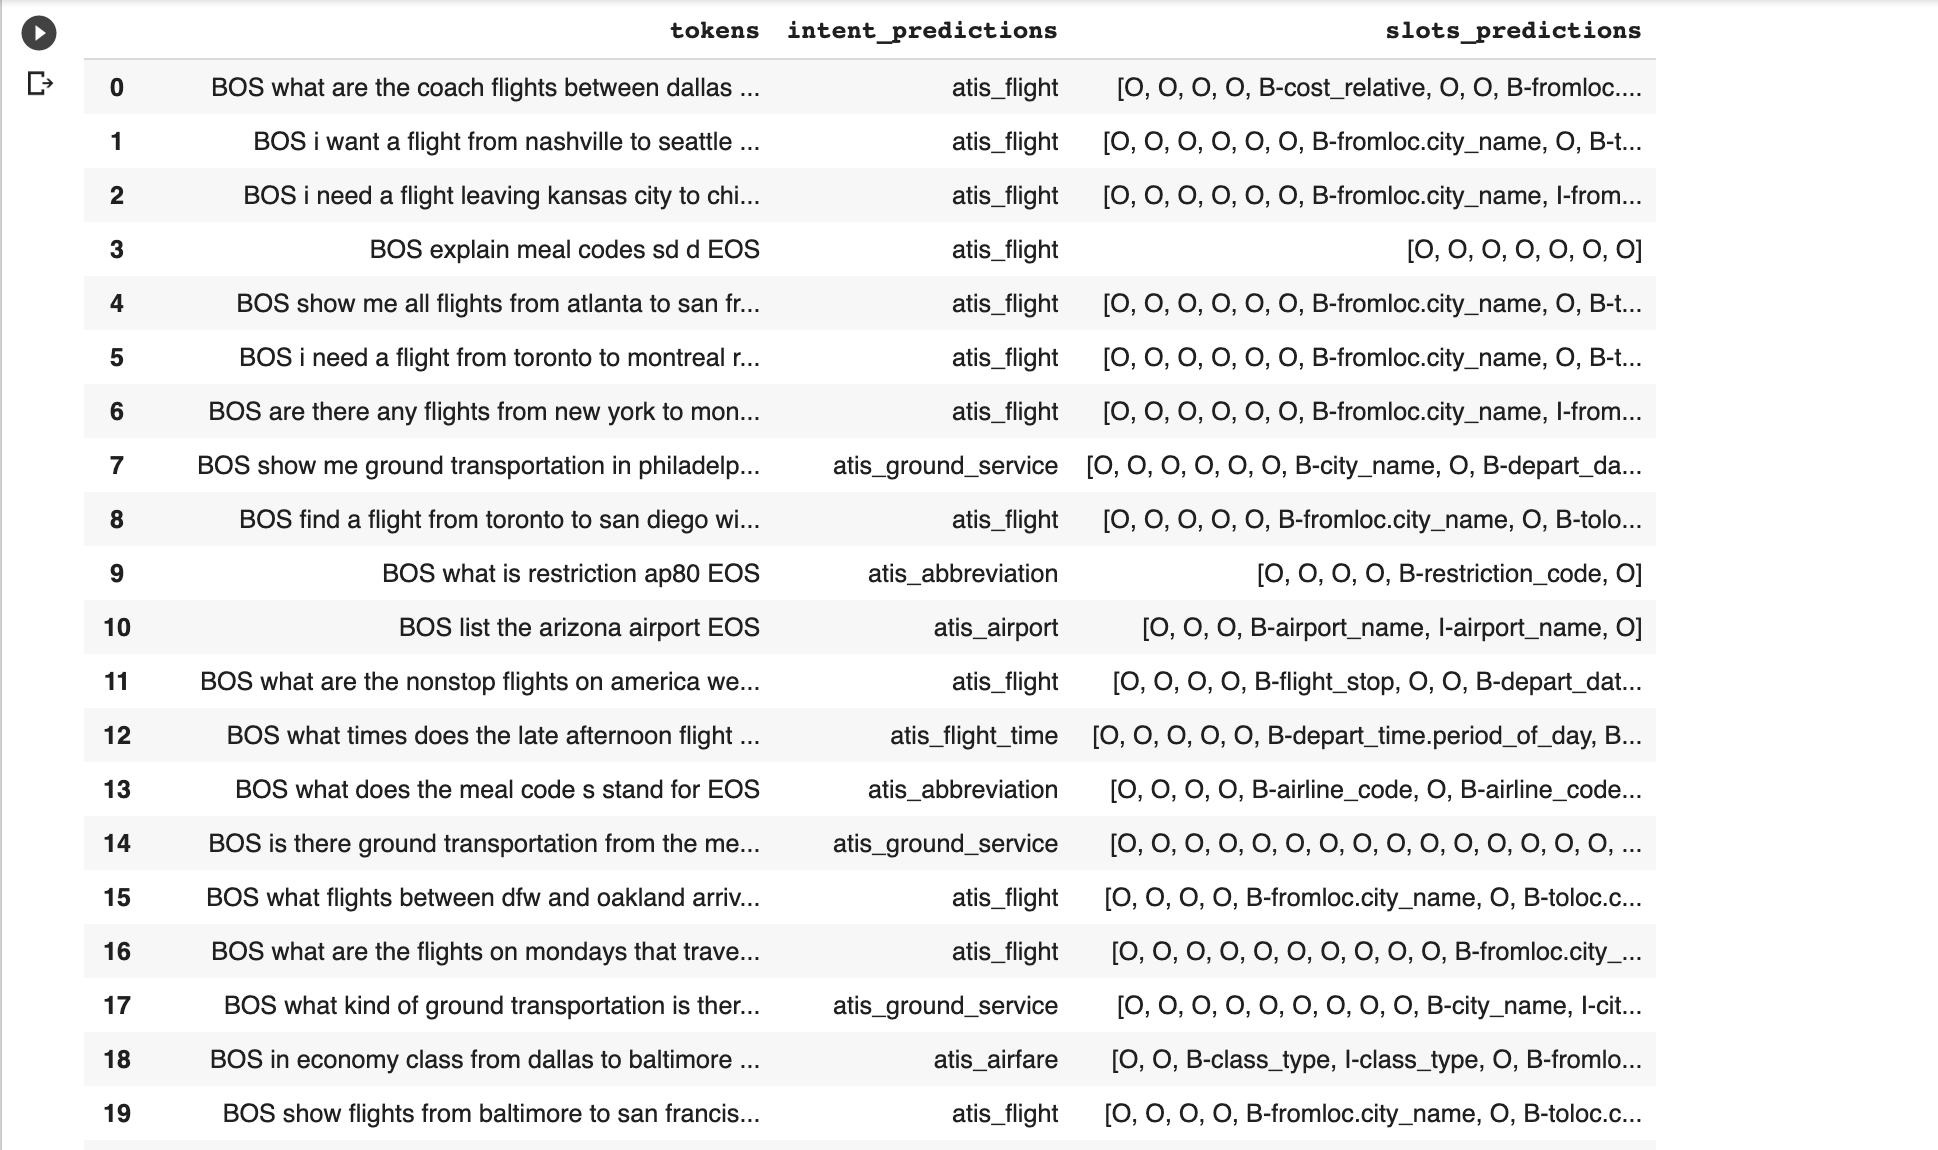
Here is the code to get the predictions from the test dataset.
Finally, here is what the predictions look like.
Resources to Learn More
If you are not technical, this is probably the best course you can take to learn about deep learning and its possibilities: AI For Everyone.
If you have a technical background, I recommend this specialization: Deep Learning by Andrew Ng. I also completed the one from Udacity last year, but I found the NLP coverage was more in-depth in the Coursera one.
The third module, Structuring Machine Learning Projects, is incredibly valuable and unique in its approach. The material in this course will provide some of the key knowledge you need to reduce the errors in the model predictions.
My inspiration to write this article came from the excellent work on keyword classification by Dan Brooks from the Aira SEO team.
More Resources:
- Exploring the Role of Content Groups & Search Intent in SEO
- How to Scrape Google SERPs to Optimize for Search Intent
- Advanced Technical SEO: A Complete Guide
Image Credits
All screenshots taken by author, June 2019


