Google Analytics can be an online marketer’s most powerful tool for gathering a wealth of information about a website and its users. However, there are two common problems that occur when using Google Analytics to mine search data. First, mining for causative and actionable data can sometimes be very unproductive. This is referred to as “analysis paralysis,” and has been known to affect online marketers of any skill level. Secondly, commanding Google Analytics’ interface to pull custom search data can be very time-consuming.
For instance, consider the time it takes to weed out the multitude of branded keyword variations and misspellings from your search data, especially if you have to do it each time you access the information. Fortunately, Google Analytics allows users to use both default and custom advanced segments to expedite the data gathering process. In addition to showing you streamlined ways to pull and compare search data, I will also show you how to build custom segments that gather specific data on your website’s true shoppers and the keywords they are using to find your products and services.
A. Introduction to Setting up Google Analytics
The first step in harnessing the power of Google Analytics is customizing it to meet your specific needs. With some advanced knowledge, not only can you mine the right data, you can also keep your settings for future reporting. Here is a basic overview of how to access some of the default advanced segments in Google Analytics:
1. Start by clicking on the Dashboard tab.
2. Locate the Advanced Segments tab on the top-right corner of the chart.

3. Once you click on this tab, a drop down with segment options appears. These include items such as all visitors, paid search traffic, non-paid traffic, visits with conversions, etc.

4. Click on as many options as you need, then click “Apply” to view the overlapping data.
With regard to custom segments, there are two major reasons why each user should pay special attention to them. One, custom segments pinpoint exactly what you want to know. For example, if your company had an advertisement live at the Kentucky Derby, you could isolate traffic shortly thereafter in Kentucky. Two, you can “bookmark” these custom settings and access them as frequently as you want.
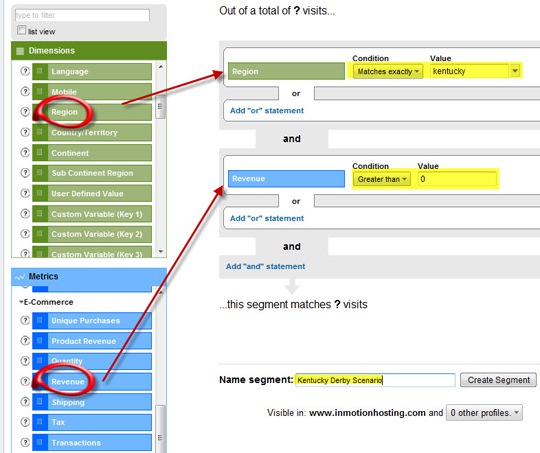
Let’s use the Kentucky Derby advertisement scenario to help you get started on how to create a custom segment.
- From the Dashboard, click on the “All Visits” tab.
- Then, click the “create a new advanced segment” button.
- Pick “Region” as your Dimension.
- Your Condition will be “matches exactly,” and the Value will be “Kentucky.”
- Then, select “Revenue” as your Metric.
- Your Condition will be “Greater than,” and your Value will be “0” (zero).

This graph will tell you exactly what you want to know, such as how much traffic did that Kentucky Derby advertisement bring you? More practical examples will be covered later on, but this should give you a good idea of how to get started.
B. Determining Your True Shopper
Google Analytics provides you with tools, but it will take some creativity on your part to make them work practically. As illustrated in the Kentucky Derby advertisement scenario, you can tweak these tools to find out exactly what you want. Nonetheless, the biggest obstacle is setting up the custom segments correctly. In the following case study, you will see an example of how my company, InMotionHosting, used an advanced segment to pull search data on true shoppers.
Case Study of True Shoppers
As the in-house SEO Specialist for InMotion Hosting, I’m usually excited to see a spike in online traffic to our website because it often leads to an increase in conversions as well. Earlier this month, however, our website experienced a substantially higher amount of traffic than usual, but no improvement in conversions. I suspected that our website was receiving “junk” traffic from our affiliates, but I couldn’t jump to this conclusion just yet. I needed to gather data on our “true shoppers,” but before doing so, I needed to define the criteria that establishes a “true shopper.” After collaborating with my affiliates counterpart at work, I determined that the following criteria had to all be in place before an online visitor could be deemed a true shopper:
- They were referred to our website by an affiliate – this qualifies them as warm leads interested in purchasing web hosting of some kind.
- They did not bounce from our website – this shows that once they got to the site, they were interested in reading more about the other products/services that we offered.
After defining our true shopper, I created a simple and effective segment that separated the wheat from the chaff. Here are the steps I took:
- From the Advanced Segment menu, click “Create a new advanced segment.”
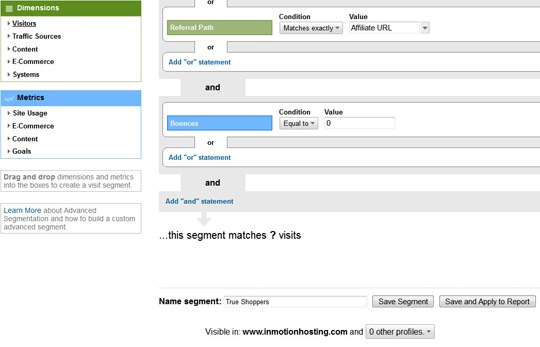
- Next, select “Referral Path” from the Dimensions section.
- Then, select “Matches Exactly” as the Condition.
- Enter the affilliate’s URL as the Value.
- Then, click “Add “or” statement.”
- Select “Bounces” from the Metrics section.
- Set your Condition as “Equal to.”
- Enter your Value as “0” (zero).
- Finally, name the segment and click “Save Segment.”

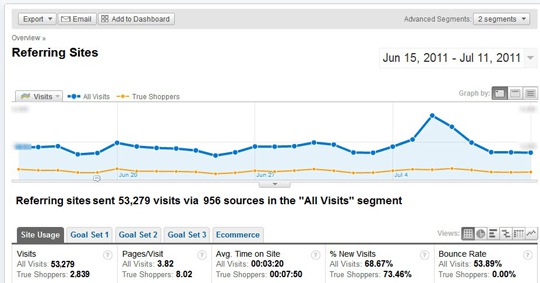
After activating the segment, I quickly realized that the rise in traffic did not correspond with an influx of true shoppers (see image below). The custom segment that I created proved my suspicion about affiliates sending us “junk” traffic. In fact, most of the additional traffic that our website was receiving from affiliates was bouncing upon entry. Furthermore, I also had the ability to pull even more detailed information, such as the revenue generated and the time spent on a particular web page by a true shopper.

* Disclaimer: Various data has been fabricated/hidden to protect private information.
In the next week’s follow up we’ll discuss how to filter out non-branded keywords.


![AI Overviews: We Reverse-Engineered Them So You Don't Have To [+ What You Need To Do Next]](https://www.searchenginejournal.com/wp-content/uploads/2025/04/sidebar1x-455.png)