Universal Analytics is being sunset, and everyone is rushing to migrate from UA to Google Analytics 4 (GA4).
In this guide, we’ll help you migrate your custom events and walk you through how to set up GA4 custom events.
Types Of Events That GA4 Automatically Tracks By Default
Google Analytics 4 automatically tracks several events by default, without any additional configuration. Some of these events relevant to web property tracking include:
- click.
- file_download.
- form_start.
- form_submit.
- page_view.
- scroll.
- session_start.
- user_engagement.
- video_complete.
- video_progress.
- video_start.
- view_search_results.
It also collects the following parameters by default:
- page_location.
- page_referrer.
- page_title.
- screen_resolution.
- language.
But in most cases, it is not enough for comprehensive tracking, and here is where custom event tracking comes into help.
Let’s look at how to set up custom event tracking in GA4.
How Does Google Analytics Event Tracking Work?
When you perform an action on a website or in the app, GA4 sends requests with detailed information about your activity, called events (formerly “hits” in Universal Analytics).
After receiving those requests, GA4 processes the submitted data, aggregating and organizing it to generate meaningful reports and insights.
How To Set up Custom Event Tracking Manually In GA4
First, I would like to share one of the most powerful sides of GA4: You can create custom events by using other events which meet certain criteria.
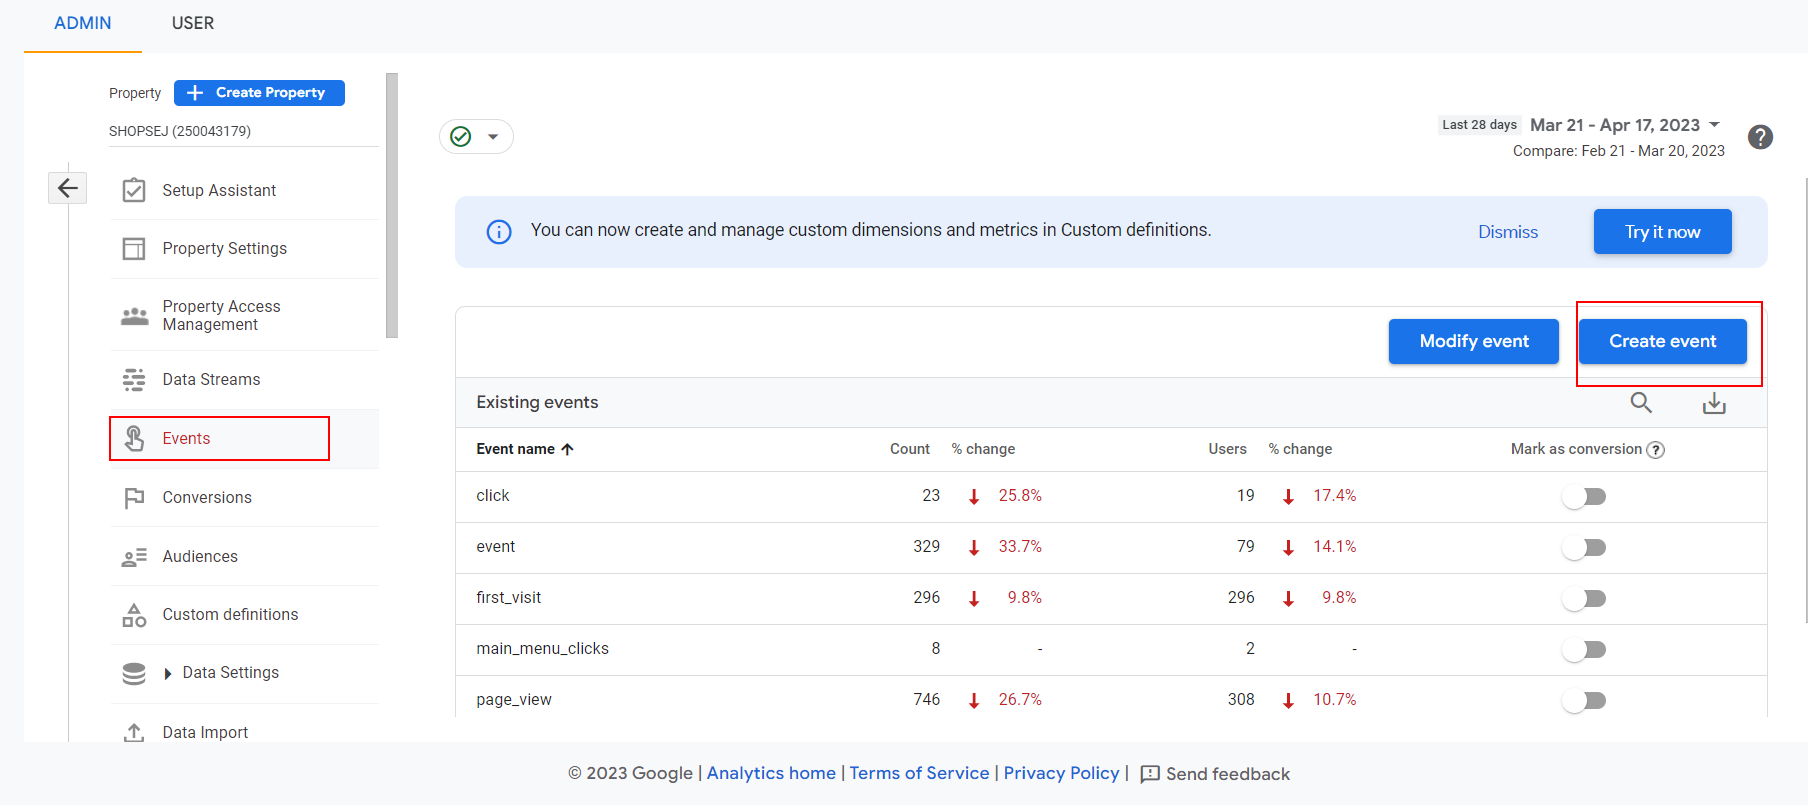
Navigate to Events in GA4 and click the Create Event blue button in the top right corner.
-
 Screenshot from GA4, April 2023
In the popup dialog, click Create.
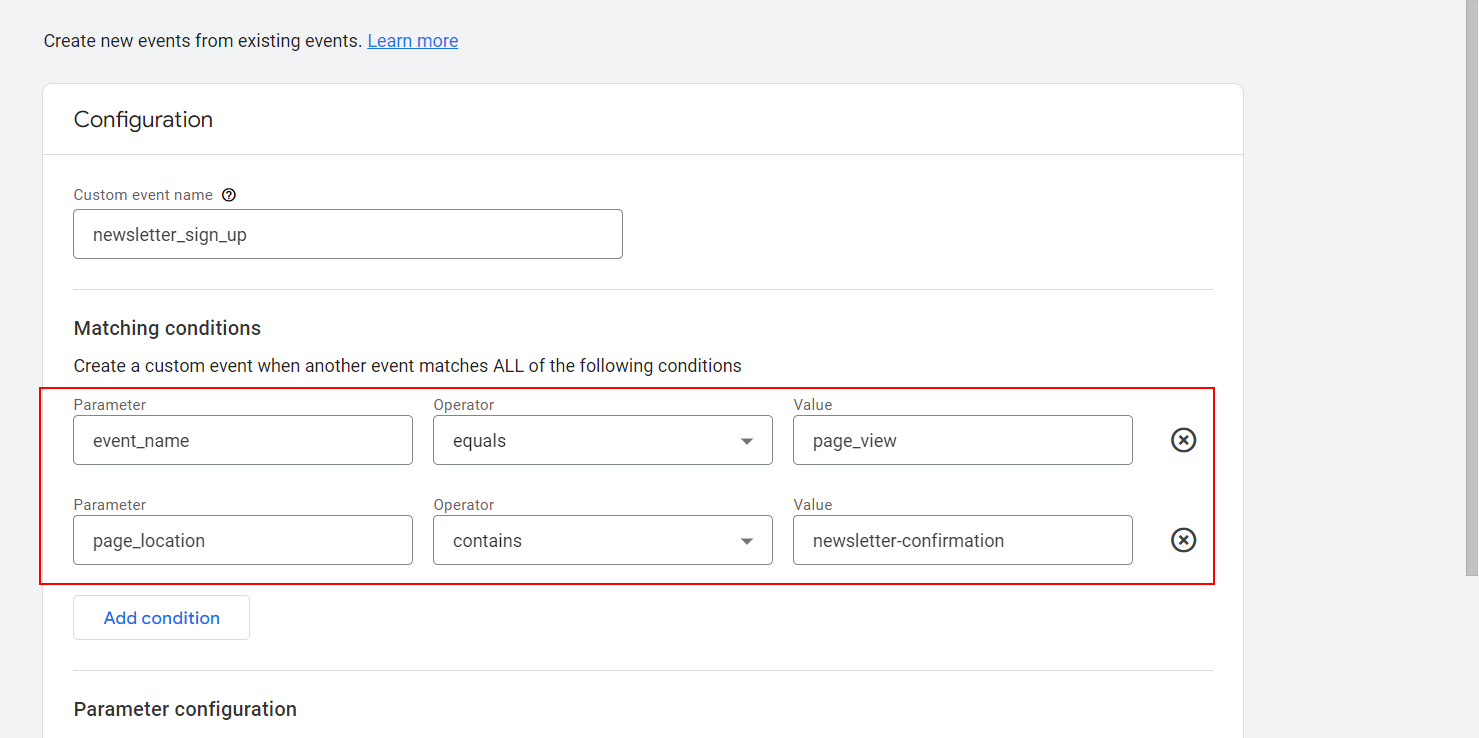
In the dialog, you can set criteria for when your new custom event should fire.
Here, we created a “newsletter_sign_up” event on the page_view event when the page_location parameter contains “newsletter-confirmation” in the URL (as you read above, GA4 tracks these by default).
Based on your newsletter thank you page URL specifics, it can be different.
-
 Screenshot from GA4, April 2023
And what is even cooler: you can turn that event into a conversion and track sign-ups as conversions.
Pretty easy, isn’t it? This is one of the wonders GA4 brings with it; no coding skills are needed to make this magic happen.
You can use this feature in a bunch of different scenarios. But if you run into a situation where this is still not enough to meet your needs, you might need to set up events with custom parameters.
Below we will discuss advanced techniques for setting up custom events.
How To Set Up Custom Event Tracking With Custom Parameters In GA4
In Universal Analytics, there are four parameters for events you can track, and there is no option to add more parameters:
- Event Category.
- Event Action.
- Event Label.
- Event Value.
In GA4, there is no longer such a structure, but it comes with more flexibility, as you can define as many event parameters as you want.
The advantage is that you get highly customized event tracking with lots of data, but the downside is that it’s no longer a plug-in-and-play like UA.
Configuring custom event tracking in Google Analytics 4 (GA4) requires several steps.
In order to track events with custom parameters in GA4, you have to start by adding custom dimensions, and there are two ways of doing that: gtag and GTM-based.
First, we’ll discuss gtag-based implementation. If you prefer GTM-based, you can skip this first section and read that part below.
For implementation, follow the step-by-step guide below.
How To Add Custom Dimension In GA4
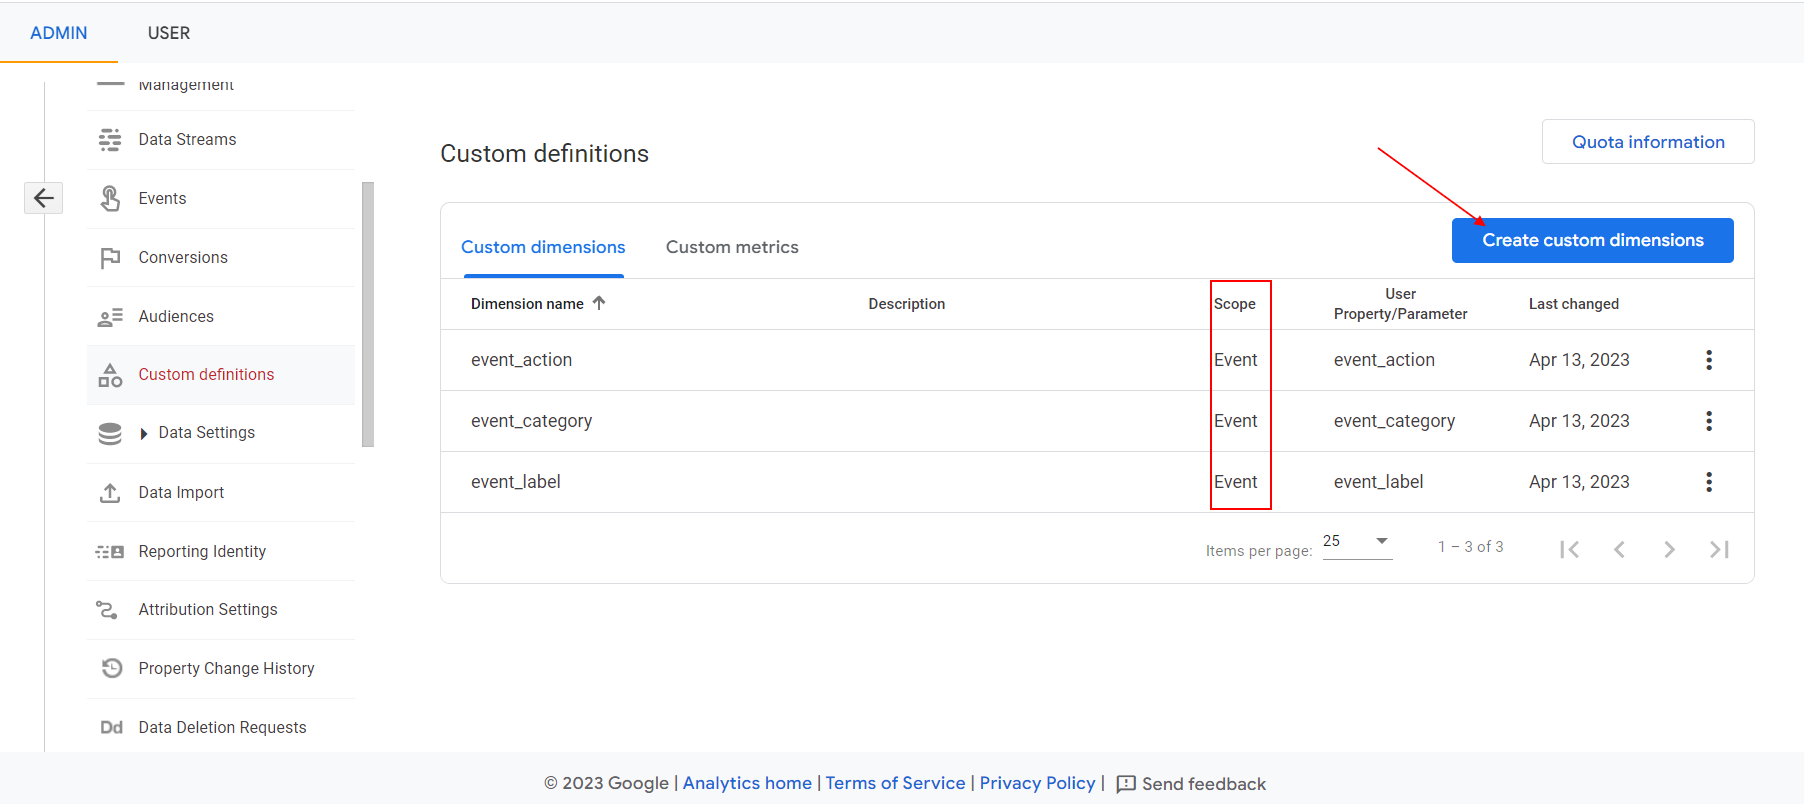
Navigate to Admin > Property > Custom definitions.
-
 Screenshot from GA4, April 2023
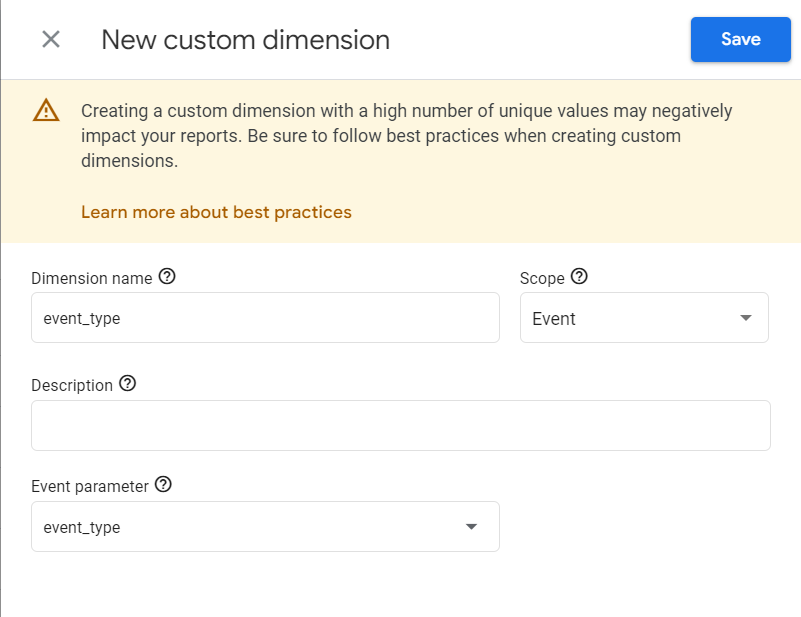
Click the Create custom dimensions blue button and create an event-scoped custom dimension by entering the dimension name and event parameter.
-
 Screenshot from GA4, April 2023
For our guide, let’s start with custom events tracking analogical to Universal Analytics with custom parameters.
- Event Category.
- Event Action.
- Event Label.
Suppose you want to track clicks on your main navigation menu.
In this case, you could set the Event Category to Menu Clicks, the Event Action to the anchor link, and the Event Label to the anchor text.
An example use case for this setup is to change the anchor text of menu items and track which ones attract more clicks, allowing you to optimize your navigation menu for better user engagement and conversion rates.
Per GA4 documentation, you should trigger a gtag event when one clicks on your menu items (we assume links are inside the <li> html tag, which have .menu-item class). You can see the example code below.
<script>
document.addEventListener('DOMContentLoaded', function() {
  var menu_anchors = document.querySelectorAll('.menu-items a');
  //Click event listener to each anchor element
   menu_anchors.forEach((anchor) => {
   anchor.addEventListener('click', (event) => {
    gtag('event', 'menu_clicks', {
       'event_category': 'Menu Clicks',
       'event_action': anchor.href,
       'event_label': anchor.textContent
    });
   });
  });
});
</script>
The event name “menu_clicks” can be anything you want, and it will have three parameters you provide. This is one approach if you don’t have Google Tag Manager and prefer gtag implementation.
You can use custom parameters to pass additional values to predefined events, for example, sign_up event. Per GA’s documentation, it supports only one parameter called “method” ( which can be anything, e.g., social login, email, etc. )
gtag("event", "sign_up", {
method: "Google"
});
By adding custom dimensions, you can also pass additional information such as sign-up subscription plan (for example, “free trial,” “basic,” “premium.”)
You can add custom dimension”sign_up_plan” and pass along with “method.”
gtag("event", "sign_up", {
method: "Google",
sign_up_plan: "basic",
});
To implement all these, you need basic JS programmer skills, which you can quickly learn by using ChatGPT. You can now test the prompt:
JavaScript code that triggers a gtag custom event with the name ‘menu_clicks’ when a user clicks on a menu item with a parent li tag that has class ‘.menu-item’. Pass the following custom event parameters: ‘event_category’ should be set to ‘Menu Clicks’, ‘event_action’ should be set to the link of the clicked item, and ‘event_label’ should be set to the anchor text of the clicked item.
Try this prompt, and you will see the magic happening.
You can copy and paste that code into your CMS code editor, and voila!
Now, let’s set up the same event tracking using the GTM tag.
I assume you’ve already installed GA4 via Google Tag Manager and will proceed with the steps from there.
You would need to add custom dimensions per the steps explained in the section above.
How To Set Up Event Tracking In Google Tag Manager
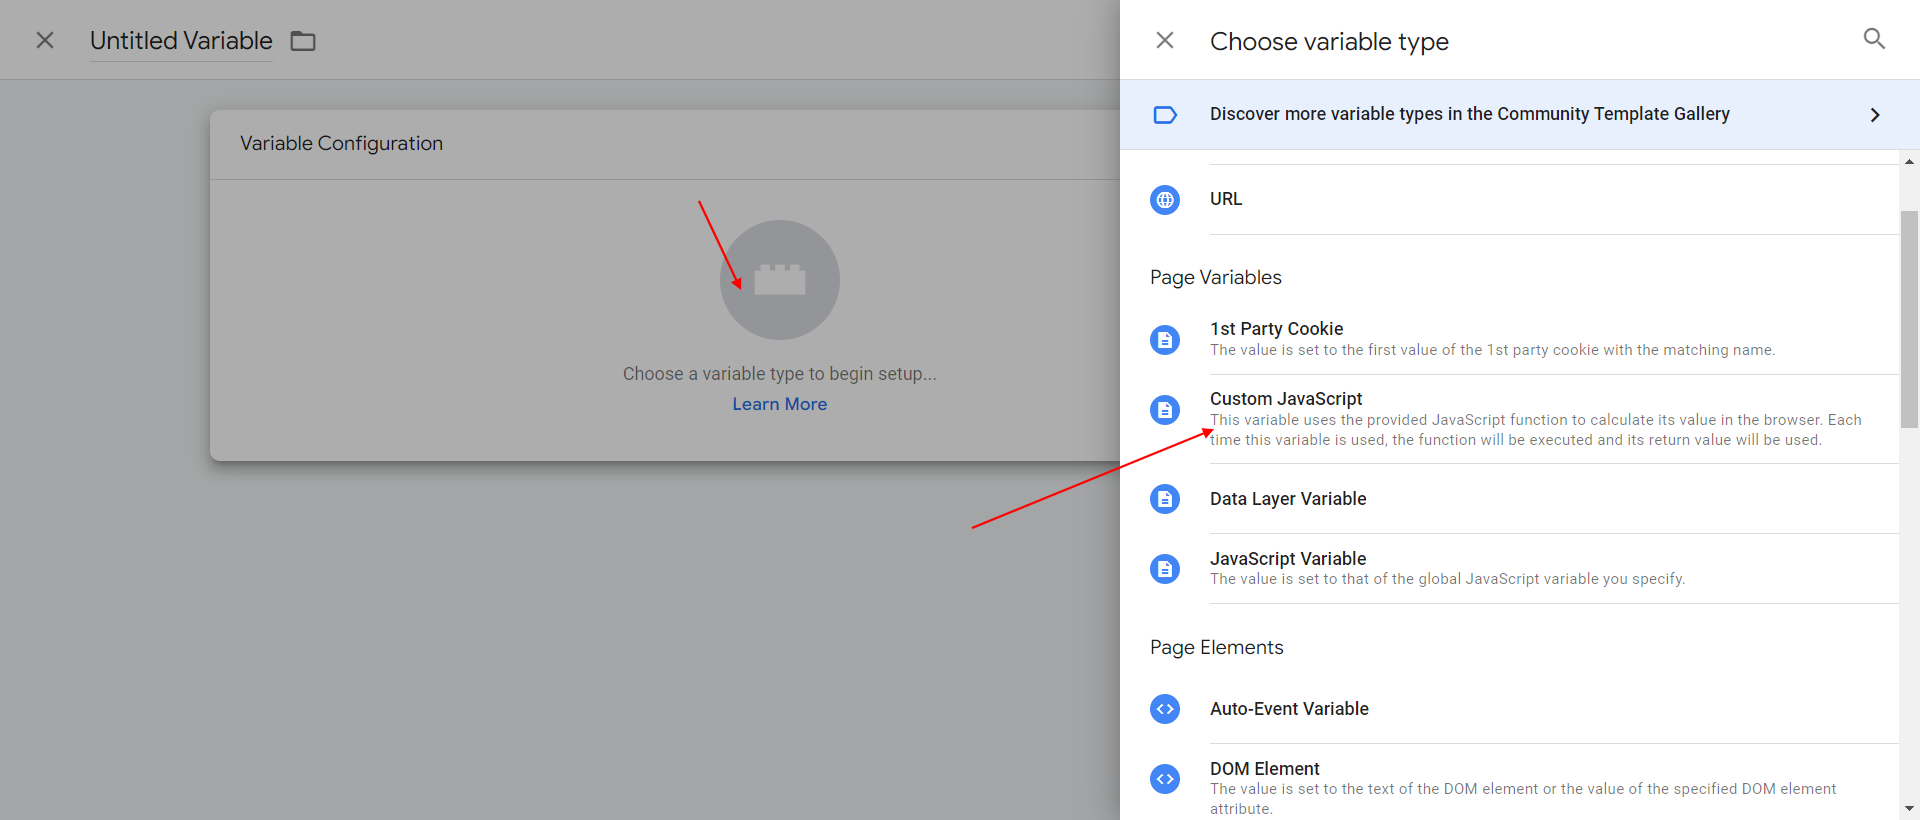
Create a new a new JavaScript variable in GTM that returns clicked anchor’s parent tag class name – because, in GTM, there is no built-in way to get parent DOM element attributes.
Navigate to Variables > User-Defined Variables and click the New button on the top right corner. In the popup dialog, select Custom Javascript.
-
 Screenshot from GA4, April 2023
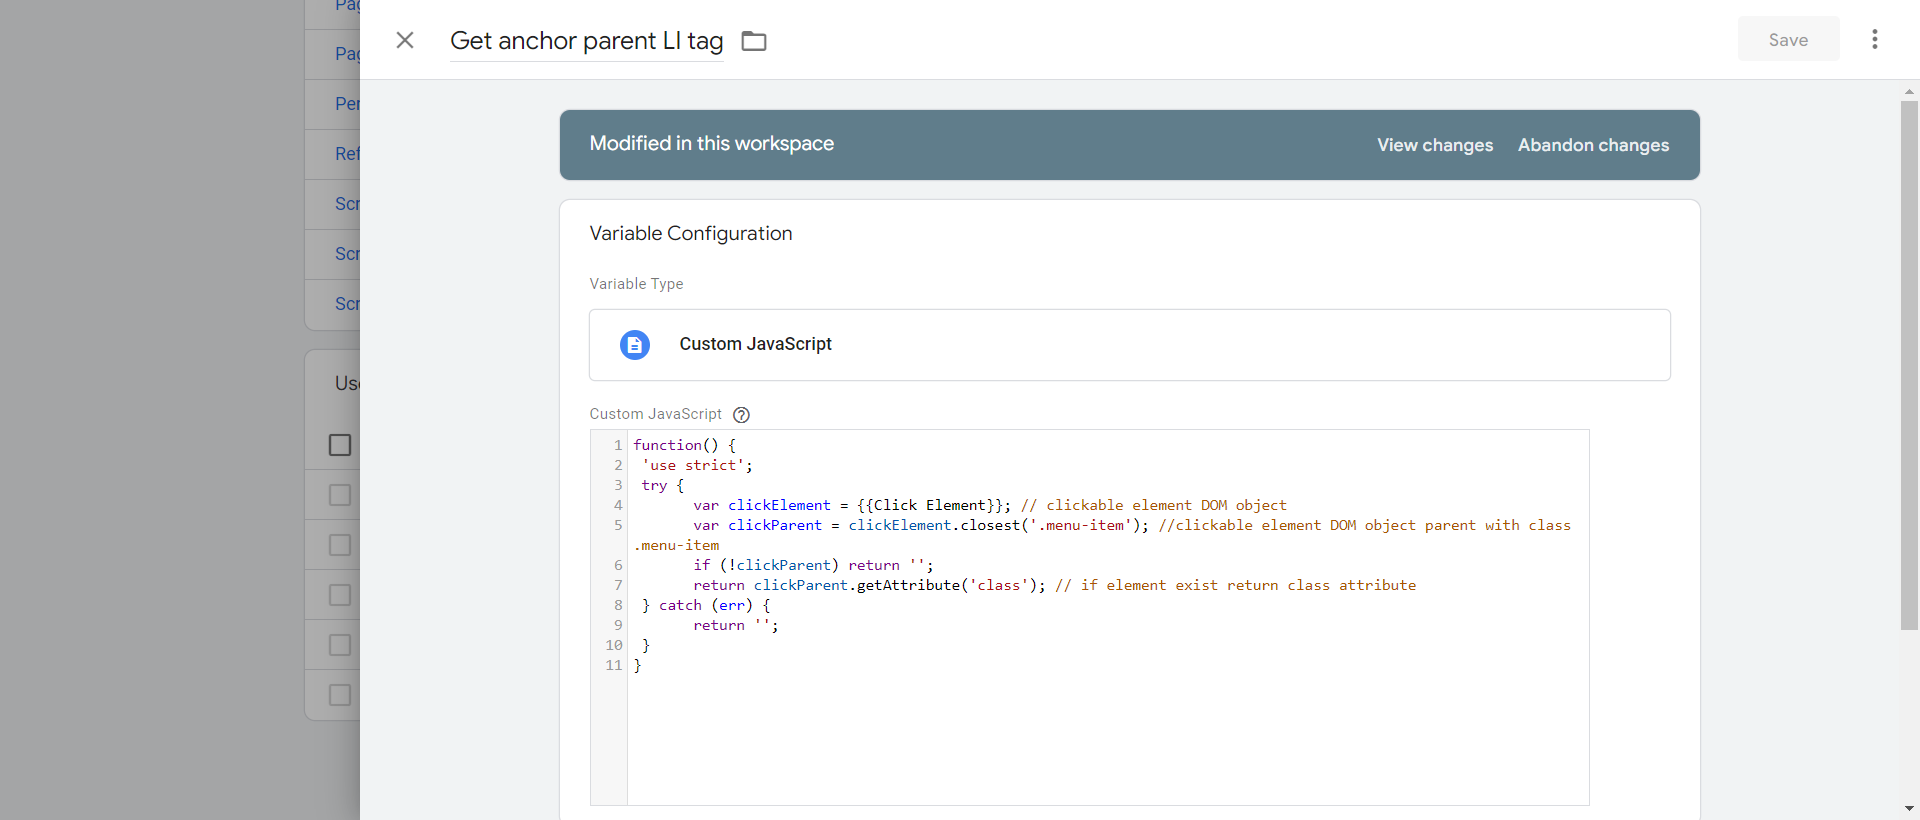
Copy and paste this code into it.
function() {
 'use strict';
 try {
       var clickElement = {{Click Element}}; // clickable element DOM object
       var clickParent = clickElement.closest('.menu-item'); //clickable element DOM object parent with class .menu-item
       if (!clickParent) return '';
       return clickParent.getAttribute('class'); // if element exist return class attribute
 } catch (err) {
       return '';
 }
}
-
 Screenshot from GA4, April 2023
This code returns the parent class attribute of a clicked element when there is a parent with class ‘.menu-item’, or it returns an empty value if there is no such parent element.
We can use this to ensure that we only detect clicks on menu item links, not other links elsewhere on the page.
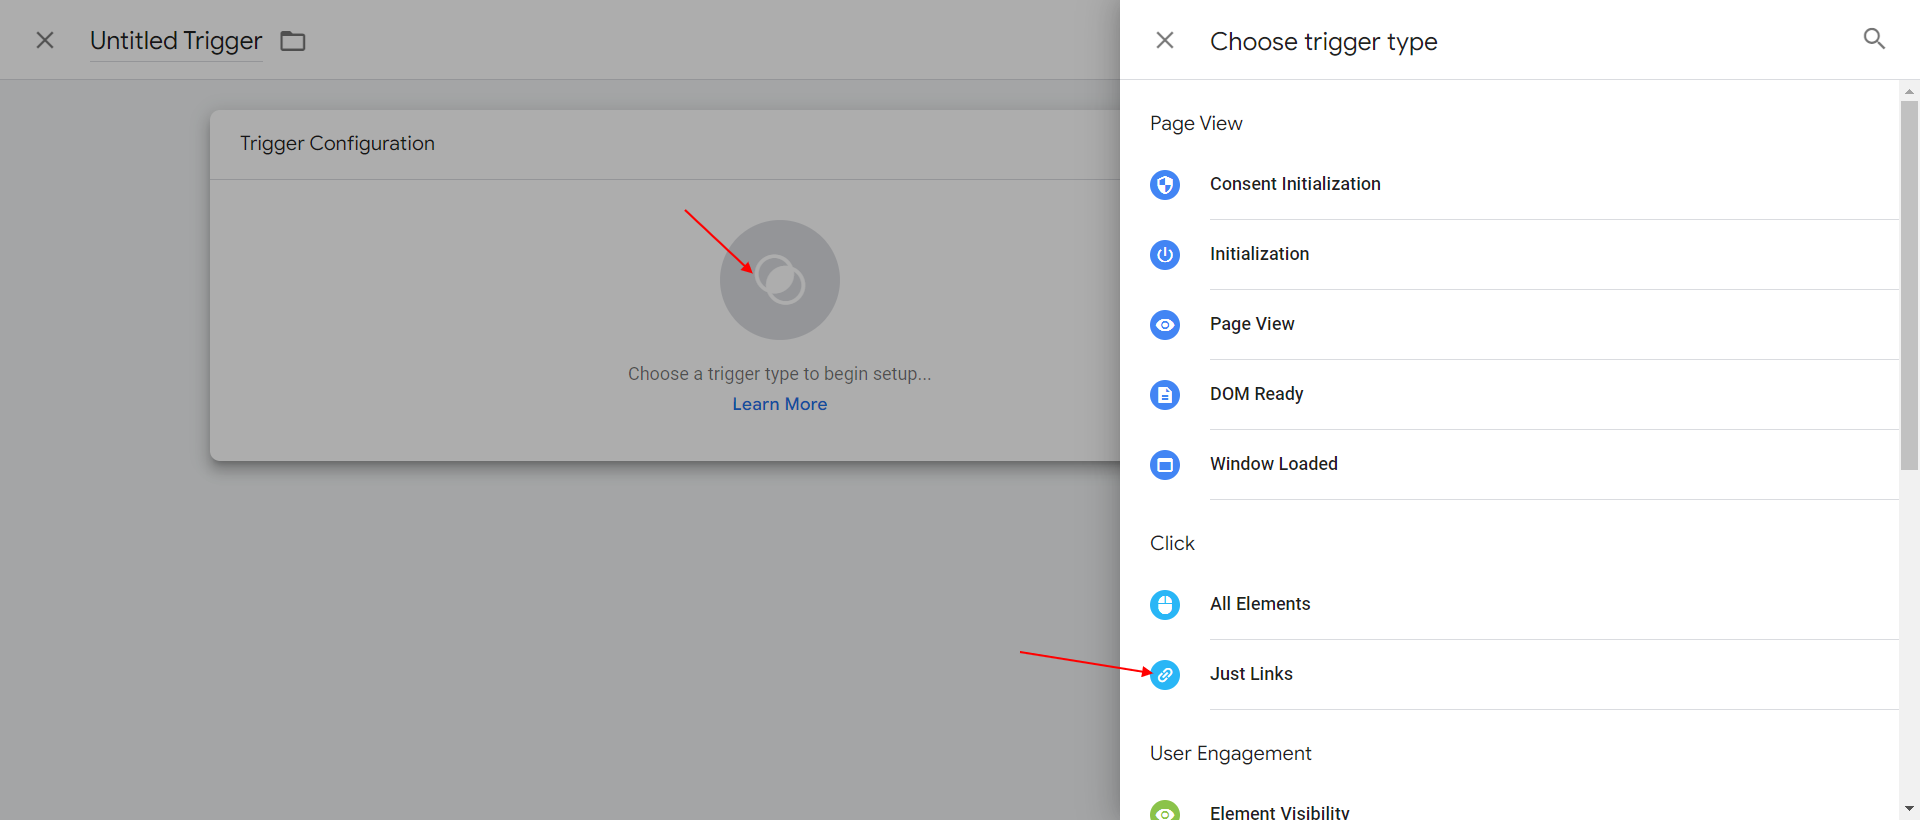
Create a new trigger in GTM that fires on all clicks on elements with a parent <li> that has class of “menu-item”.
Navigate to Triggers and click the New button in the top right corner.
From the popup dialog, select Click – Just Links.
-
 Screenshot from GA4, April 2023
 - Add new click event GTM dialog
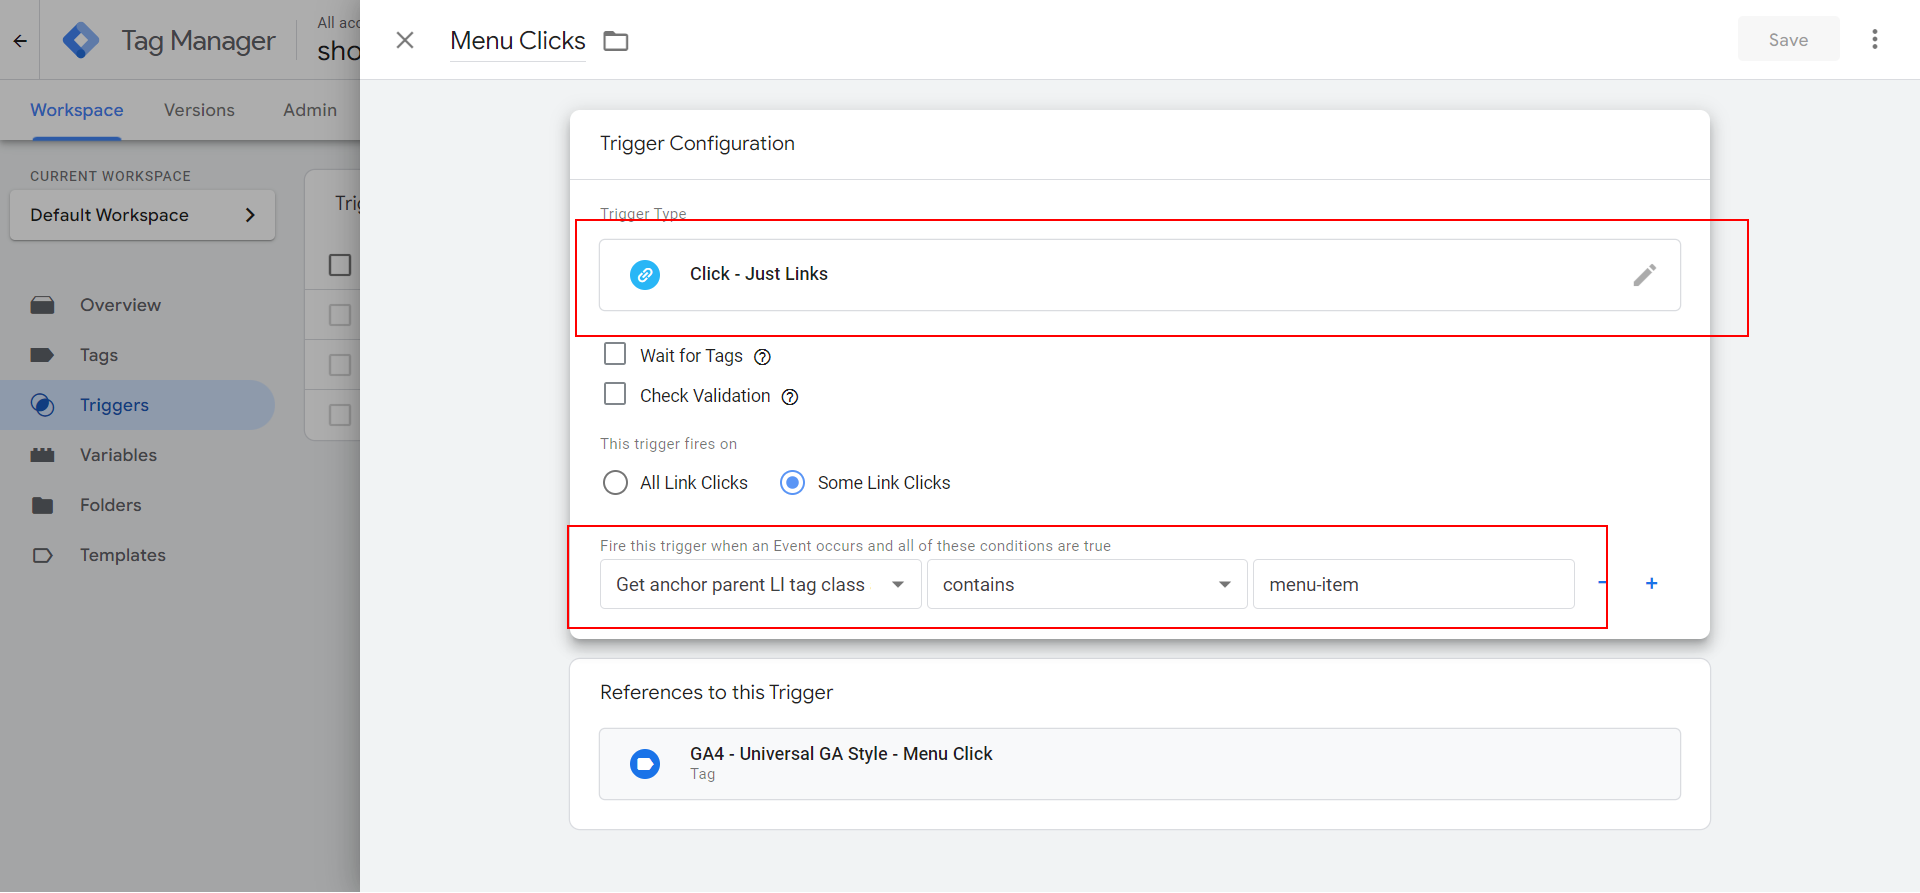
Choose Some Link Clicks > Configure it to fire on clicks where the parent element class contains the string “menu-item.”
-
 Screenshot from GA4, April 2023
Navigate to Tags and add the GA4 Event tag.
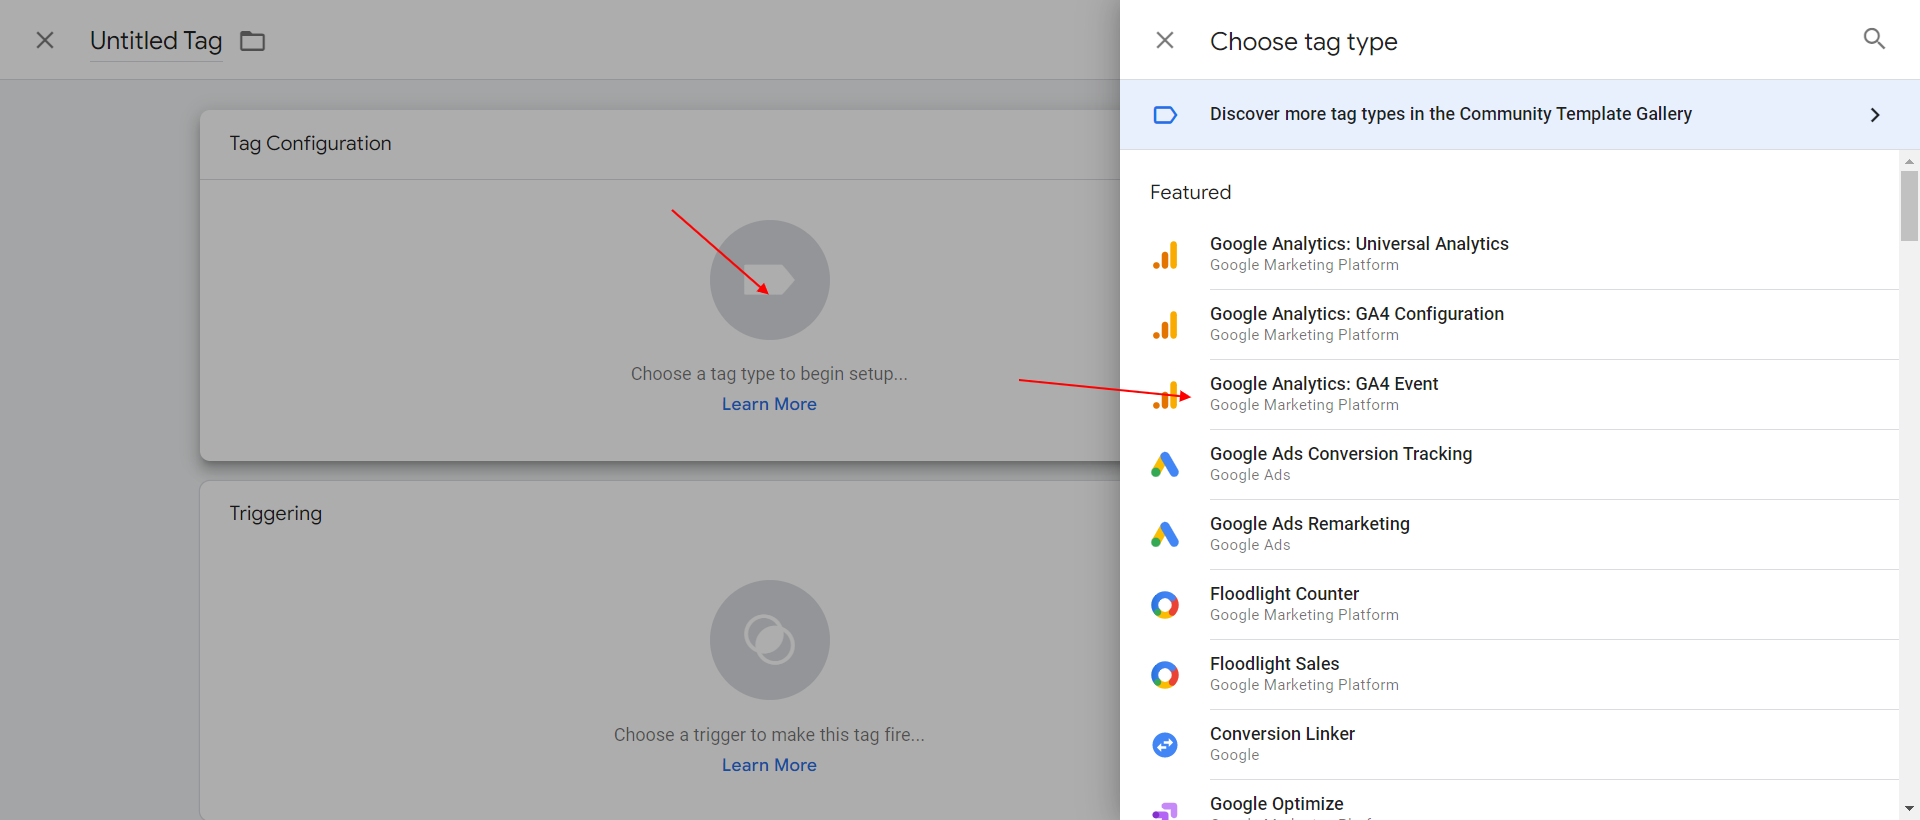 Screenshot from GA4, April 2023
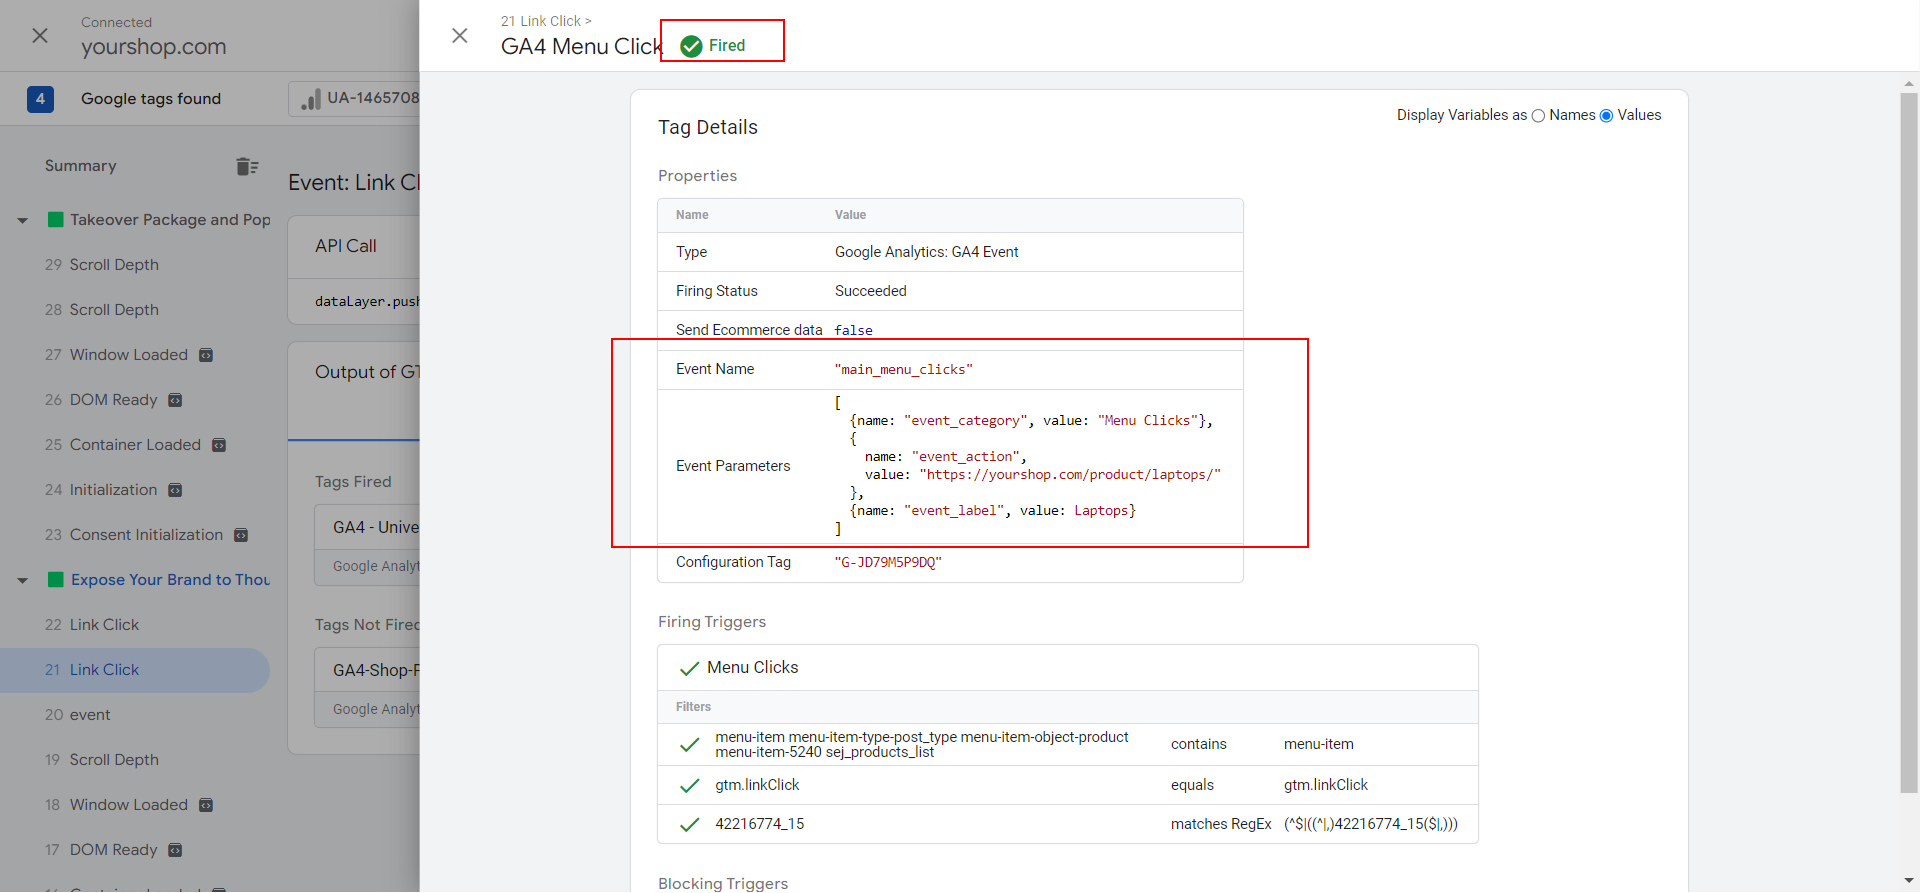
Fill in as event name “main_menu_clicks” or whatever you want to name the event, and add custom parameters event_category, event_action, and event_label.
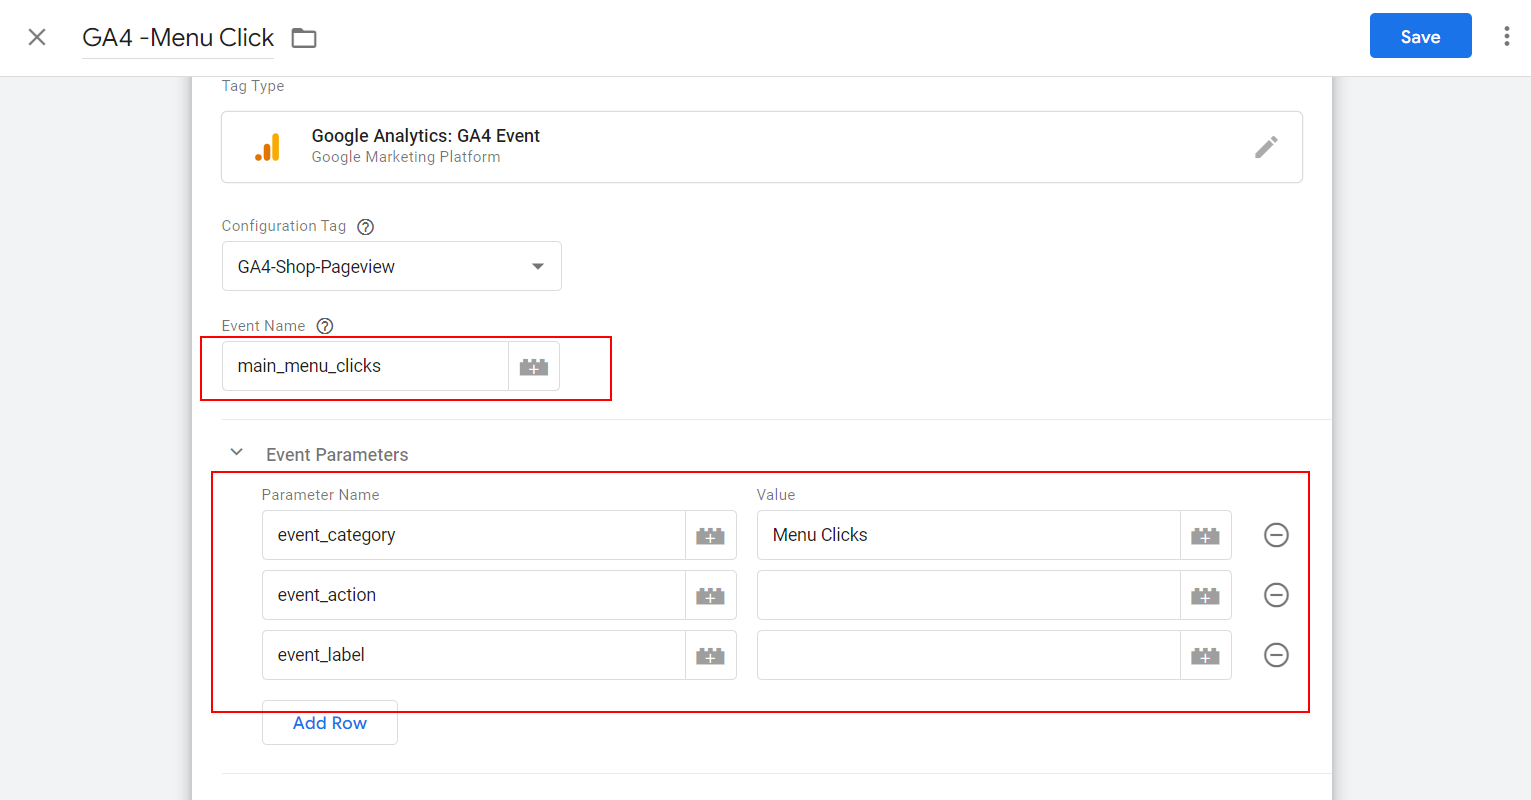 Screenshot from GA4, April 2023
For event action and label, choose Click Text and Click URL build-in variables.
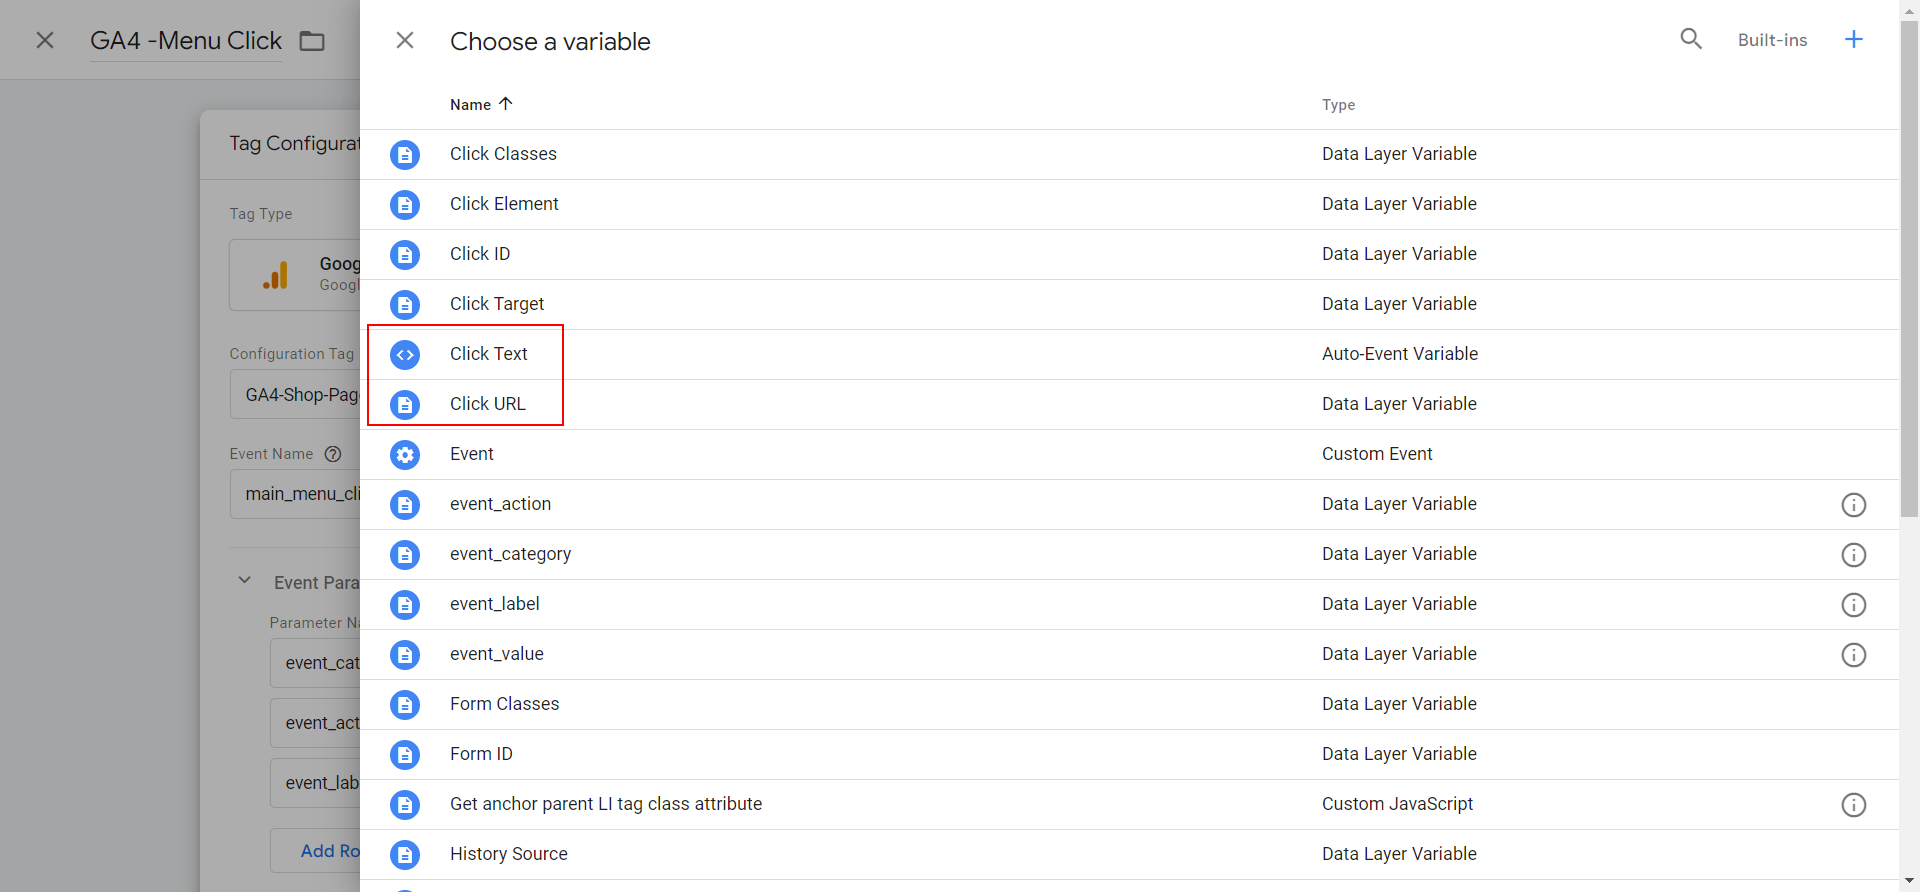 Screenshot from GA4, April 2023
Choose the trigger of Menu Clicks we created before, and save the tag.
-
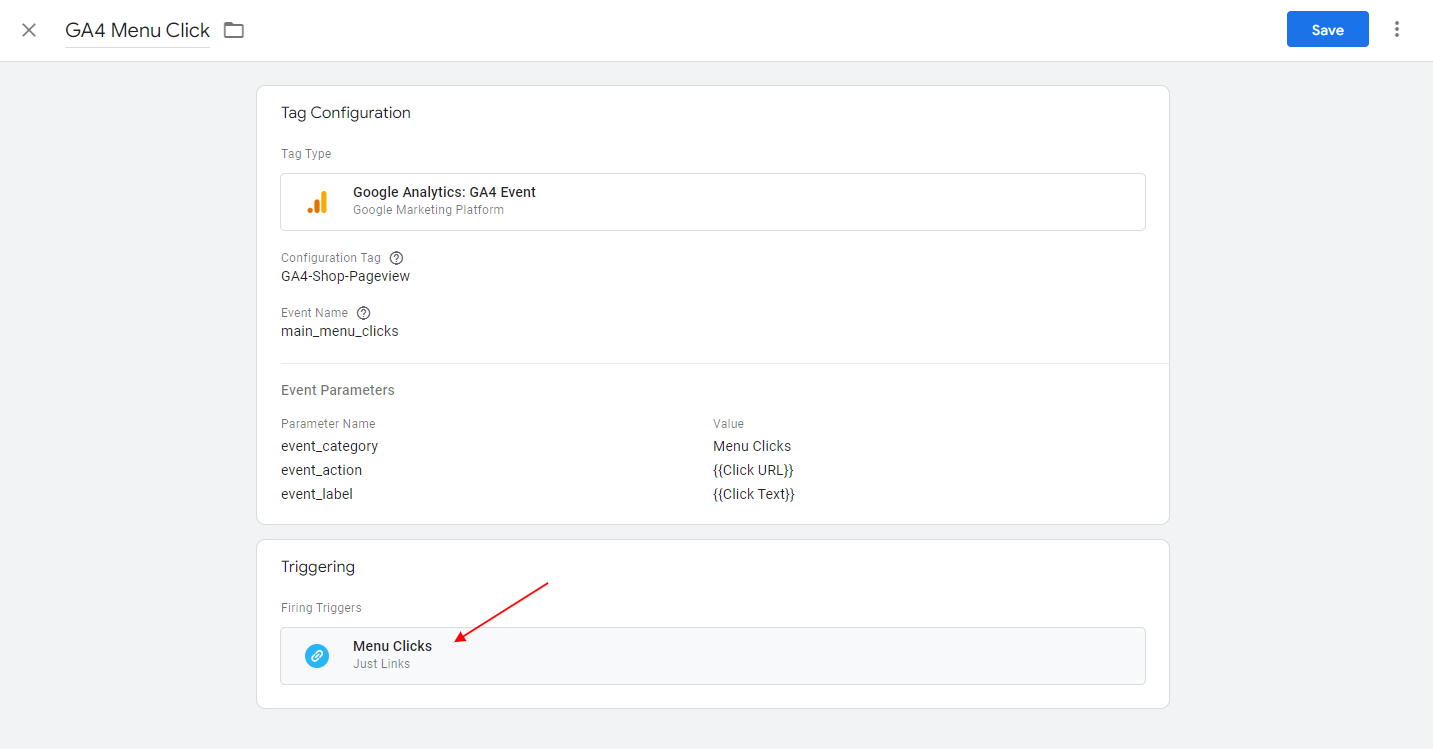 Screenshot from GA4, April 2023
Publish changes and debug to ensure when you click on your menu items, the event is triggering with all parameters set correctly.
-
 Screenshot from GA4, April 2023
How To Implement Custom Event Tracking By Using dataLayer.push() Method
If you still prefer custom coding and have GTM, you can use the datalayer.push() method.
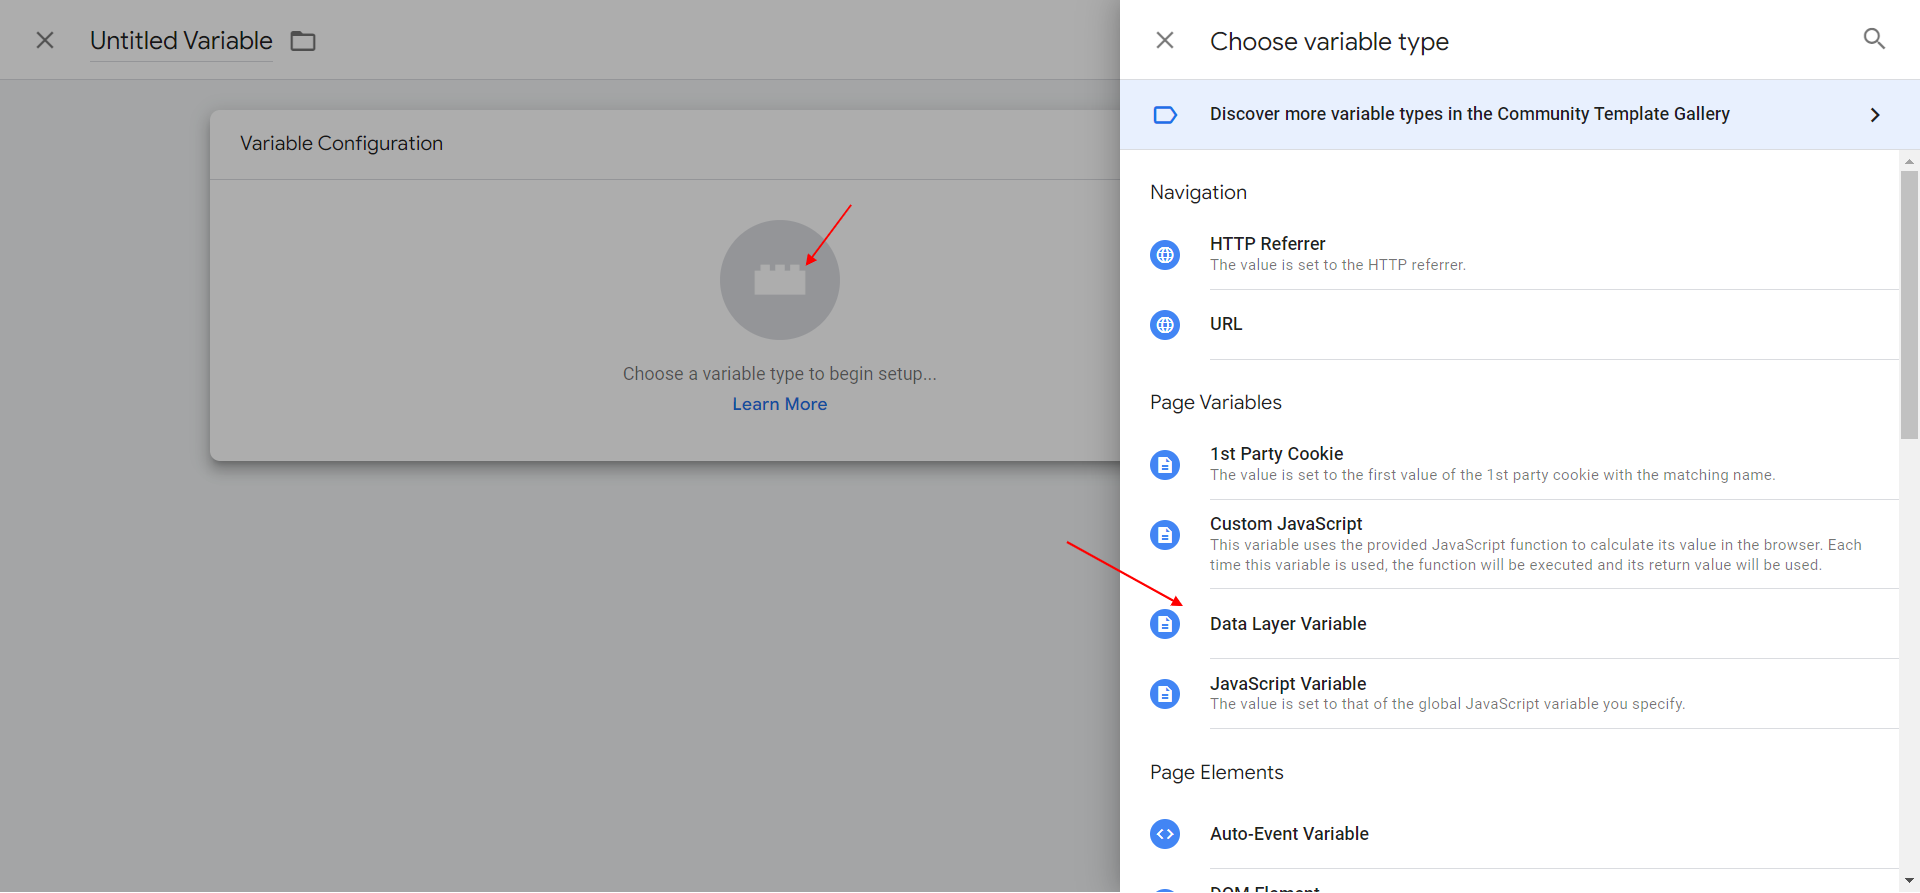
In that case, you would need to add event_category, event_action, and event_label parameters in GTM as dataLayer variables.
-
 Screenshot from GA4, April 2023
And on your website <head> section, you should use the code below.
<script>
//Click event listener to menu items with the '.menu-item' class
document.addEventListener('DOMContentLoaded', function() {
    const menuItems = document.querySelectorAll('.menu-item');
    menuItems.forEach(function(menuItem) {
    menuItem.addEventListener('click', function(event) {
    //Link and anchor text of the clicked link
    let link = menuItem.querySelector('a').href;
    let anchorText = menuItem.querySelector('a').textContent;
    // Trigger the custom event 'menu_clicks' using dataLayer.push()
    dataLayer.push({
      'event': 'menu_clicks',
      'event_category': 'Menu Clicks',
      'event_action': link,
      'event_label': anchorText
    });
  });
 });
});
</script>
How Do I Know If Google Analytics Event Tracking Is Working?
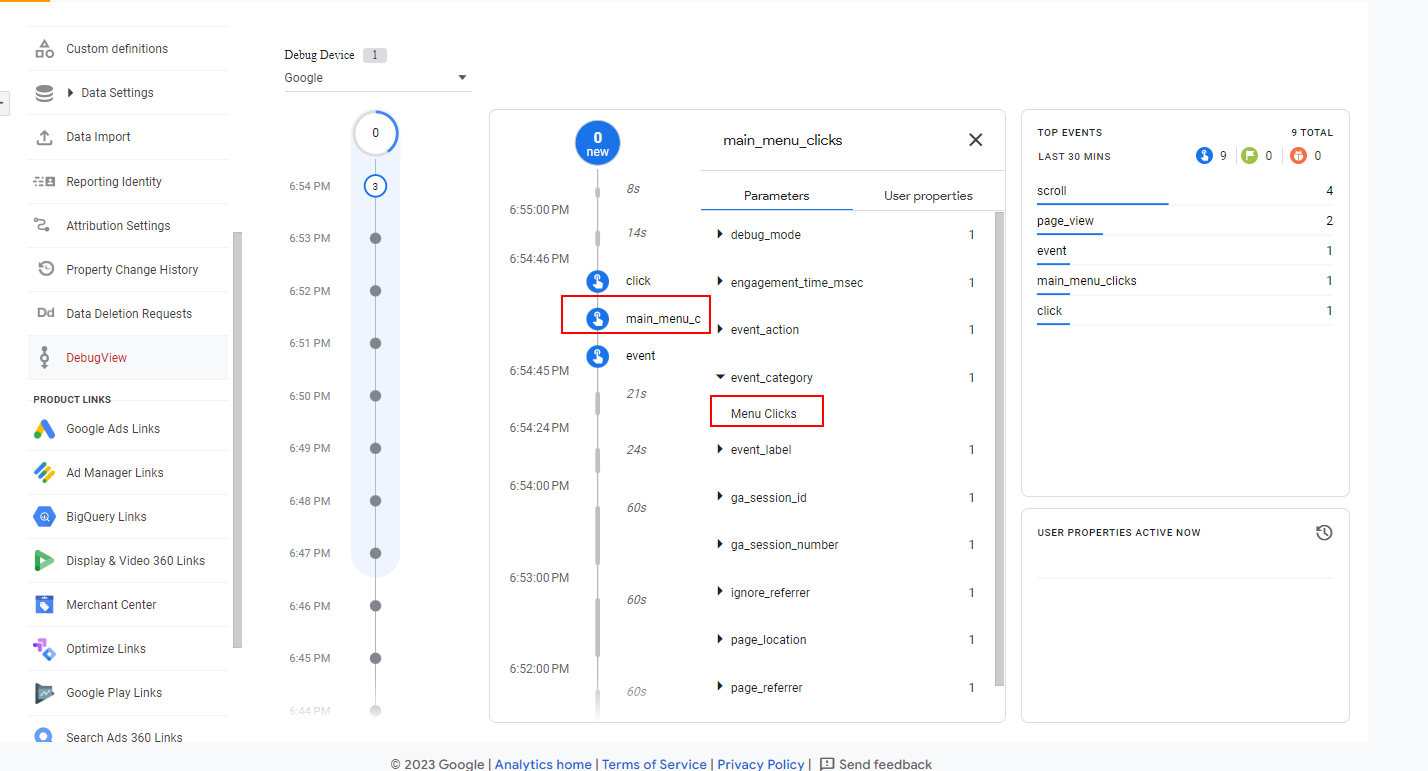
It is also important to check if you see an event log with the same parameters in GA4 debug view. It may happen that GTM will fire, but because of misconfiguration, it will not be passed to GA4.
-
 Screenshot from GA4, April 2023
In case you have gtag implementation, you should enable debug mode by installing the Chrome extension or by adding one line of code to your GA4 configuration.
gtag('config', 'G-12345ABCDE', { 'debug_mode':true });
Always debug and make sure that all custom parameters pass as expected.
Conclusion
GA4 is quite challenging and not a plug-and-play analytics tool like Universal Analytics; you need to spend a good amount of time learning it.
On the other hand, it comes with plenty of new features you can use and enhance your analytics to an unprecedented level.
By being able to customize the event tracking, you get a powerful skill that even can help you work around some of the attribution models that Google Analytics is sunsetting by tracking users’ first visit source in a custom dimension.
With this in mind, I will be publishing a step-by-step guide on how to (partially) restore the first attribution model using custom event parameters.
More resources:
- Google Analytics 4 FAQs: Stay Calm & Keep Tracking
- Form Tracking With Google Analytics (Via WordPress And GTM)
- Learn GA4: 17 Top Guides & Educational Resources
Featured Image: Andrey_Popov/Shutterstock


![[SEO, PPC & Attribution] Unlocking The Power Of Offline Marketing In A Digital World](https://www.searchenginejournal.com/wp-content/uploads/2025/03/sidebar1x-534.png)