If you are interested in scaling your Shopify business, you will need to make adjustments based on data analytics and not assumptions.
Implementing Google Analytics will give you the information you need to make store optimizations that increase your search visibility, conversions, and revenue.
Implementing Google Analytics for your Shopify store may seem daunting but in this guide, you’ll find answers to these common questions and challenges:
- What is Google Analytics?
- How to Implement the Google Analytics Code on Your Shopify Site.
- What to Track with Google Analytics.
- Key Metrics to Know in Google Analytics.
What Is Google Analytics?
Google Analytics is a free web analytics platform that websites can implement throughout their website to track a variety of metrics.
These include traffic, click-through rate, conversions, bounce rates, time on-page – and a lot more. This free tool provides priceless information to help business owners to run a successful online store.
As an online store, you likely run a variety of ads, work with influencers, and run email campaigns. All of these marketing campaigns will link back to your website.
With Google Analytics properly implemented, you will be able to determine whether your campaigns were effective. You can see how many users interacted with your campaign, how many converted, and the total revenue generated through your efforts.
This essential data analytics platform will also enable you to see all of your marketing funnels in one place.
The holistic view will allow you to see total sales and average order value, and you will be able to generate custom reports that highlight the metrics that are most meaningful to your business.
Why Do I Need Google Analytics If I Already Have Shopify Analytics?
You may be thinking your Shopify Analytics platform offers all of the information you need to make an educated business decision.
But while this provides a general summary of how your store is performing, it does not give you all the information you need to make the best-informed business decisions.
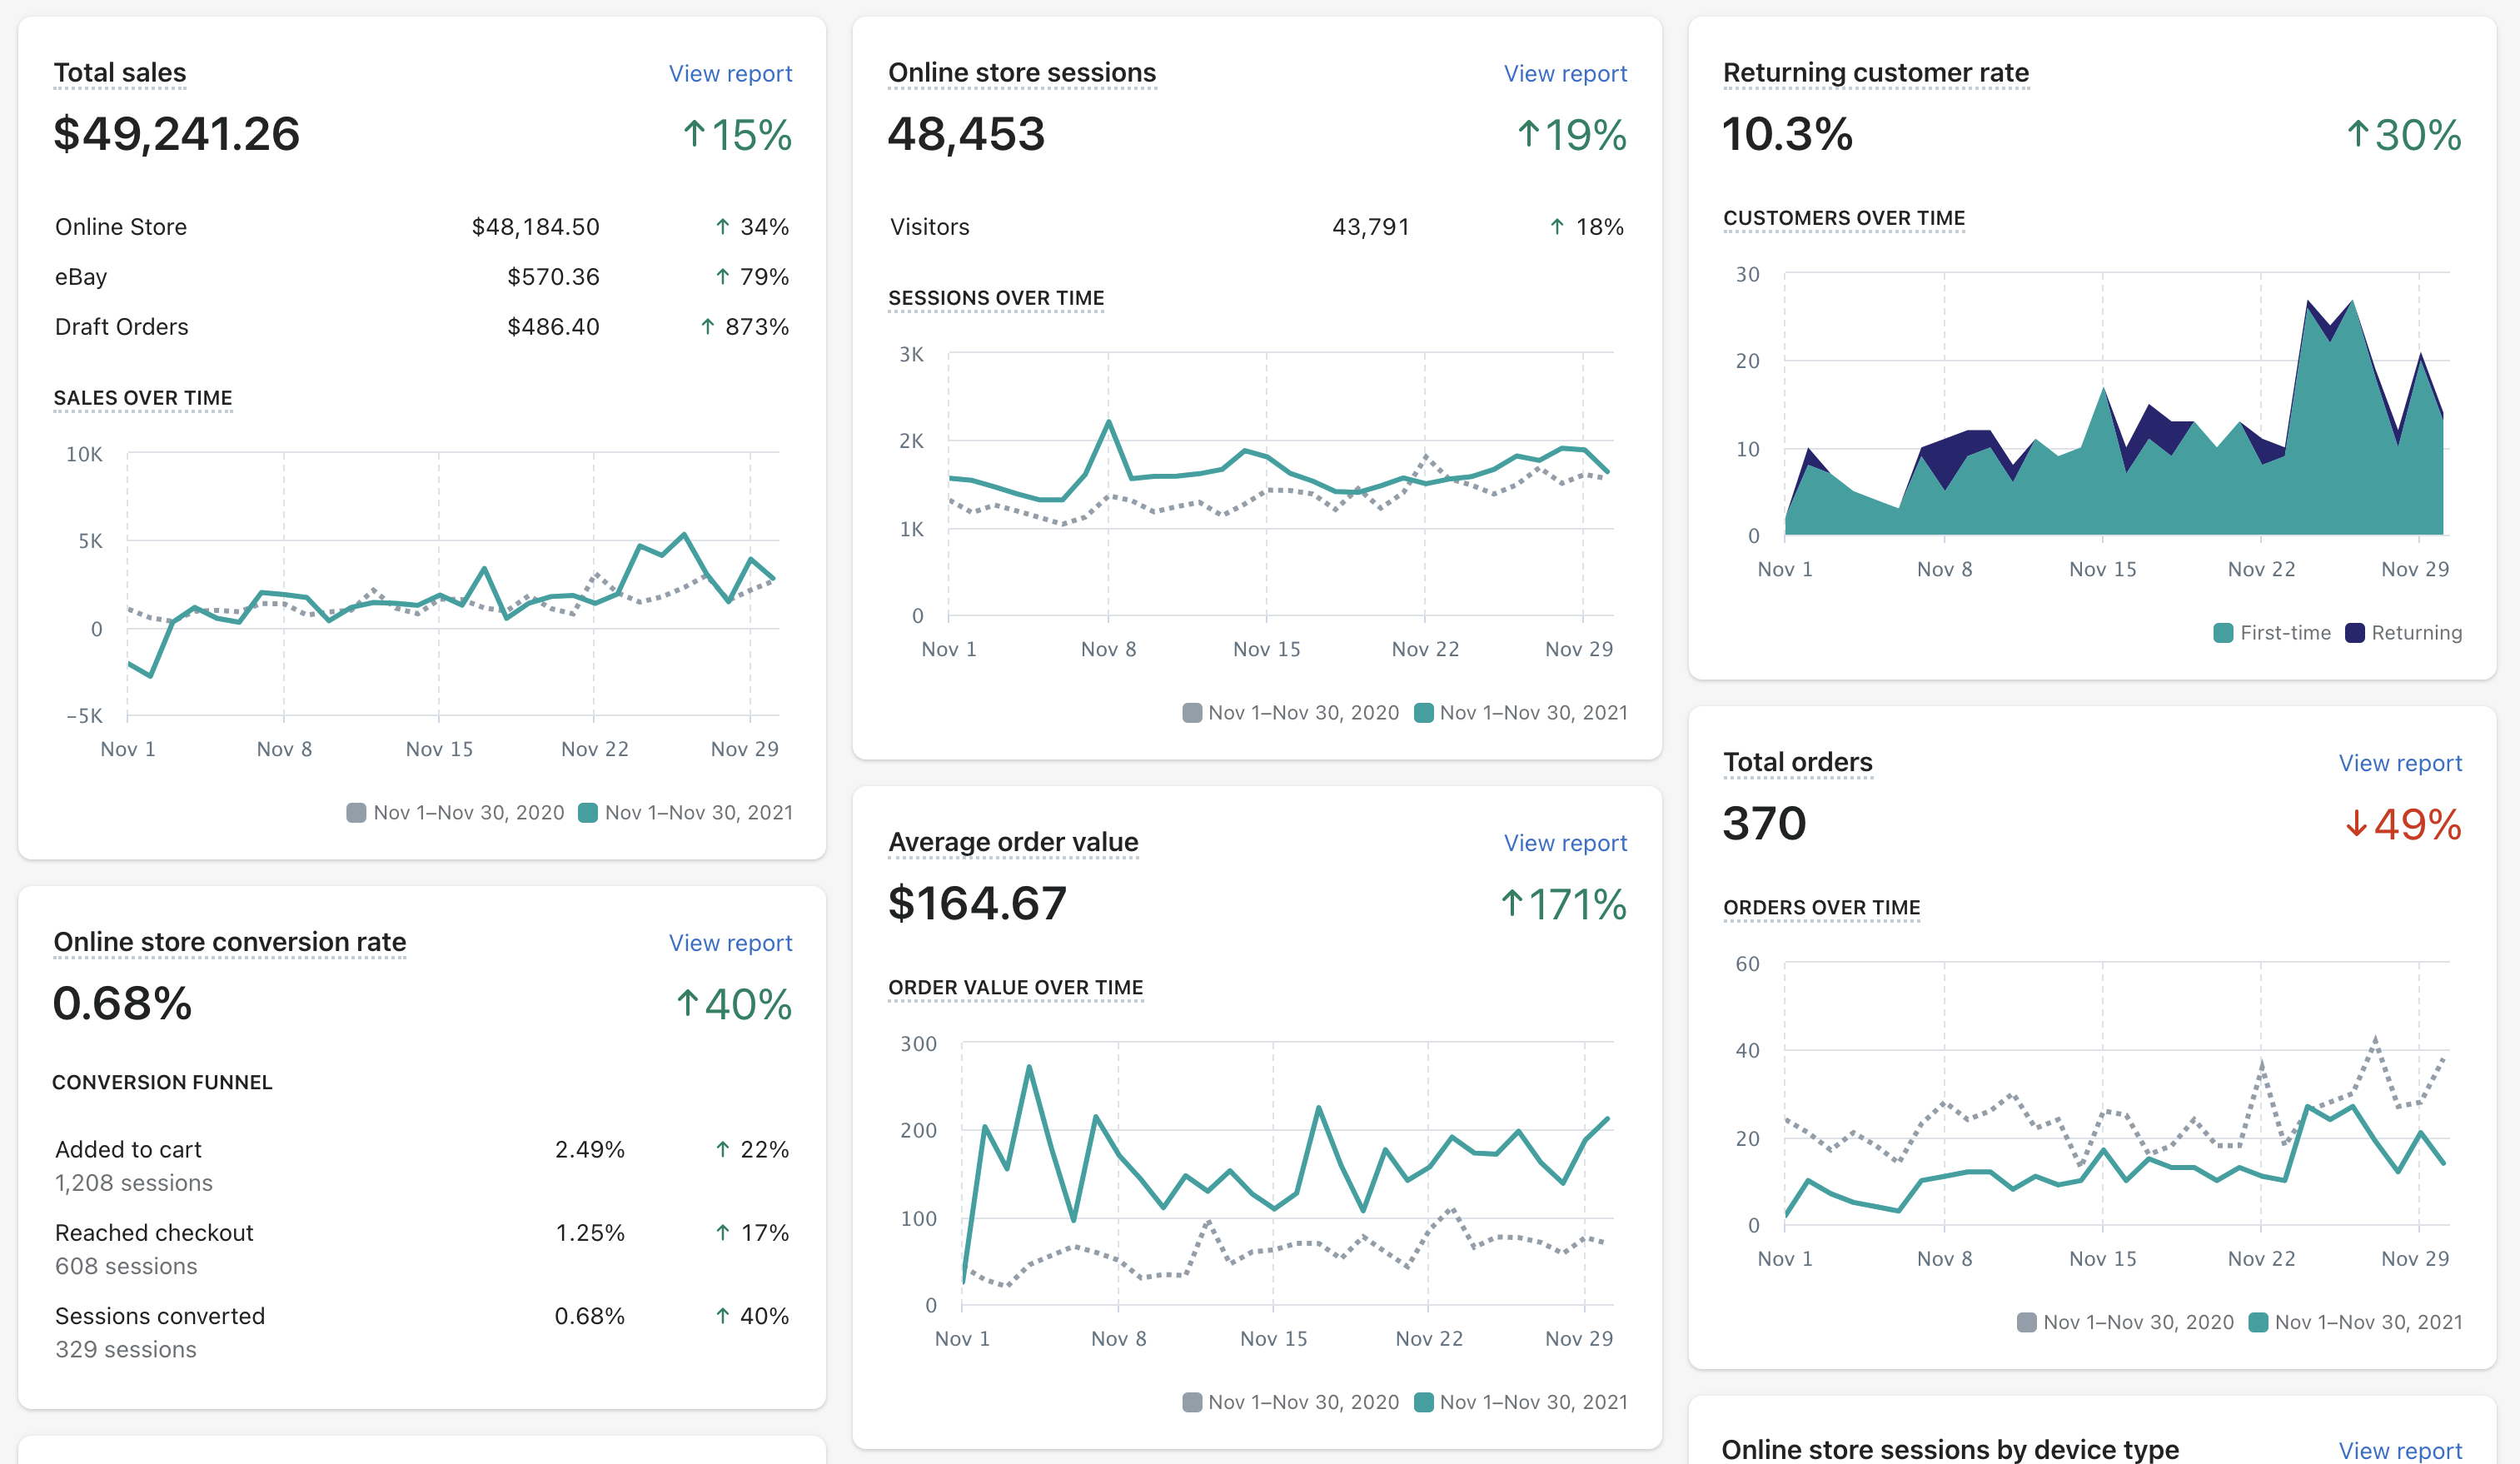
Your Shopify Analytics dashboard can show you total sales, average order value, and conversion rate. It also has pre-built reports that require very little setup on your part.
This analytics source is convenient, but it does have some pretty impactful drawbacks.
 Screenshot from Shopify Analytics, November 2021
For example, if you are looking to compare different traffic sources or what types of devices are commonly used when making a purchase, you will not be able to see this breakdown unless you use Google Analytics.
You can also use Google Analytics to identify how users engage with your site. If you discover your site is primarily visited through a mobile device, your team can begin to optimize your store’s UX experience for those end users.
Google Analytics is a little more difficult to use, but it is the best tool to give a robust overview of how customers interact with your online store.
You can gather information needed to segment your customers into more effective marketing funnels, and create marketing campaigns that scale with your business.
All of this information is free with Google Analytics. If you want to access more reports with Shopify, you will need to upgrade to a more costly plan.
How To Implement The Google Analytics Code On Your Shopify Site
To help make this as simple as possible, we will break down the step-by-step process of implementing the Google Analytics code on your Shopify site.
1. Create A Google Account For Your Business
You may already have a Gmail associated with your Shopify site, no worries, you can use this to access Google Analytics. If you do not have a pre-existing account, you will need to set up a free account to access Google Analytics.
It is not recommended to use your personal Gmail for your online store. Keeping them separate will help you manage access to your business information.
2. Create An Analytics Account
Google has two different types of Analytics platforms, Universal Analytics and Google Analytics 4.
Universal Analytics is commonly referred to as the “old” Analytics.
Google Analytics 4 is the latest version, and it gives stores more detailed data analytics and cross-device measurement capabilities. Currently, Shopify does not support Google Analytics 4.
Until a change has been made, you will need to create a Universal Analytics account.
You can follow this guide to help you create your Universal Google Analytics account.
3. Enable Google Analytics
Your Shopify site might already be enabled. Before you try to enable your code, double-check that it is not already enabled.
Log in to your Shopify account and click on Online Store > Preferences. Here, you will be able to see if your Google Analytics box is checked or not.
If you see a number code that begins with UA, your Google Analytics account is activated.
 Screenshot from Shopify Admin, December 2021
The second way to see whether your analytics code is implemented is by going to your Shopify admin and navigating to Themes > Actions > Edit Code.
Once there, in the Layout section, click {/} theme liquid. Within this page, you will need to look for tags that include: ga.js, gtag, js, or analytics.js.
If you find one of these tags, it means your Analytics code has been enabled on your website.
If you have not enabled Google Analytics on your Shopify site, follow the steps below.
How To Enable Google Analytics
Within Google Analytics
-
- Login to your Google Analytics account using the Gmail account you created from previous steps.
- Create your account and select your data sharing preferences.
- Click next to navigate to Property setup.
- Choose a Property name, time zone, and currency.
- Select Advanced Options.
- Create a Universal Analytics Property – Google Analytics 4 is selected by default but is not able to be used on Shopify. Make sure you select Universal Analytics to proceed.
- Once you proceed, in the “About Your Business” section, you will need to select the appropriate settings for your store.
- Select “Create.”
- Accept Terms and Service Agreement.
- Copy your Tracking ID – the number will start with UA.
Within Shopify
-
- Open your Shopify admin account.
- Go to Online Store – Preferences
- Next to Google Analytics, enter the Tracking ID you copied from our previous step.
- Remember to remove password protection from your Shopify store. This will make sure Google Analytics will show data.
- You did it! Google Analytics is now enabled on your Shopify site.
How To Enable Ecommerce Tracking Codes
Enabling ecommerce tracking codes gives you more insight into your customer’s user experience.
You can use two different options of ecommerce tracking codes.
Basic Ecommerce Tracking
Track transaction and revenue data using a confirmation landing page.
How to enable basic ecommerce tracking in GA:
- Open Google Analytics
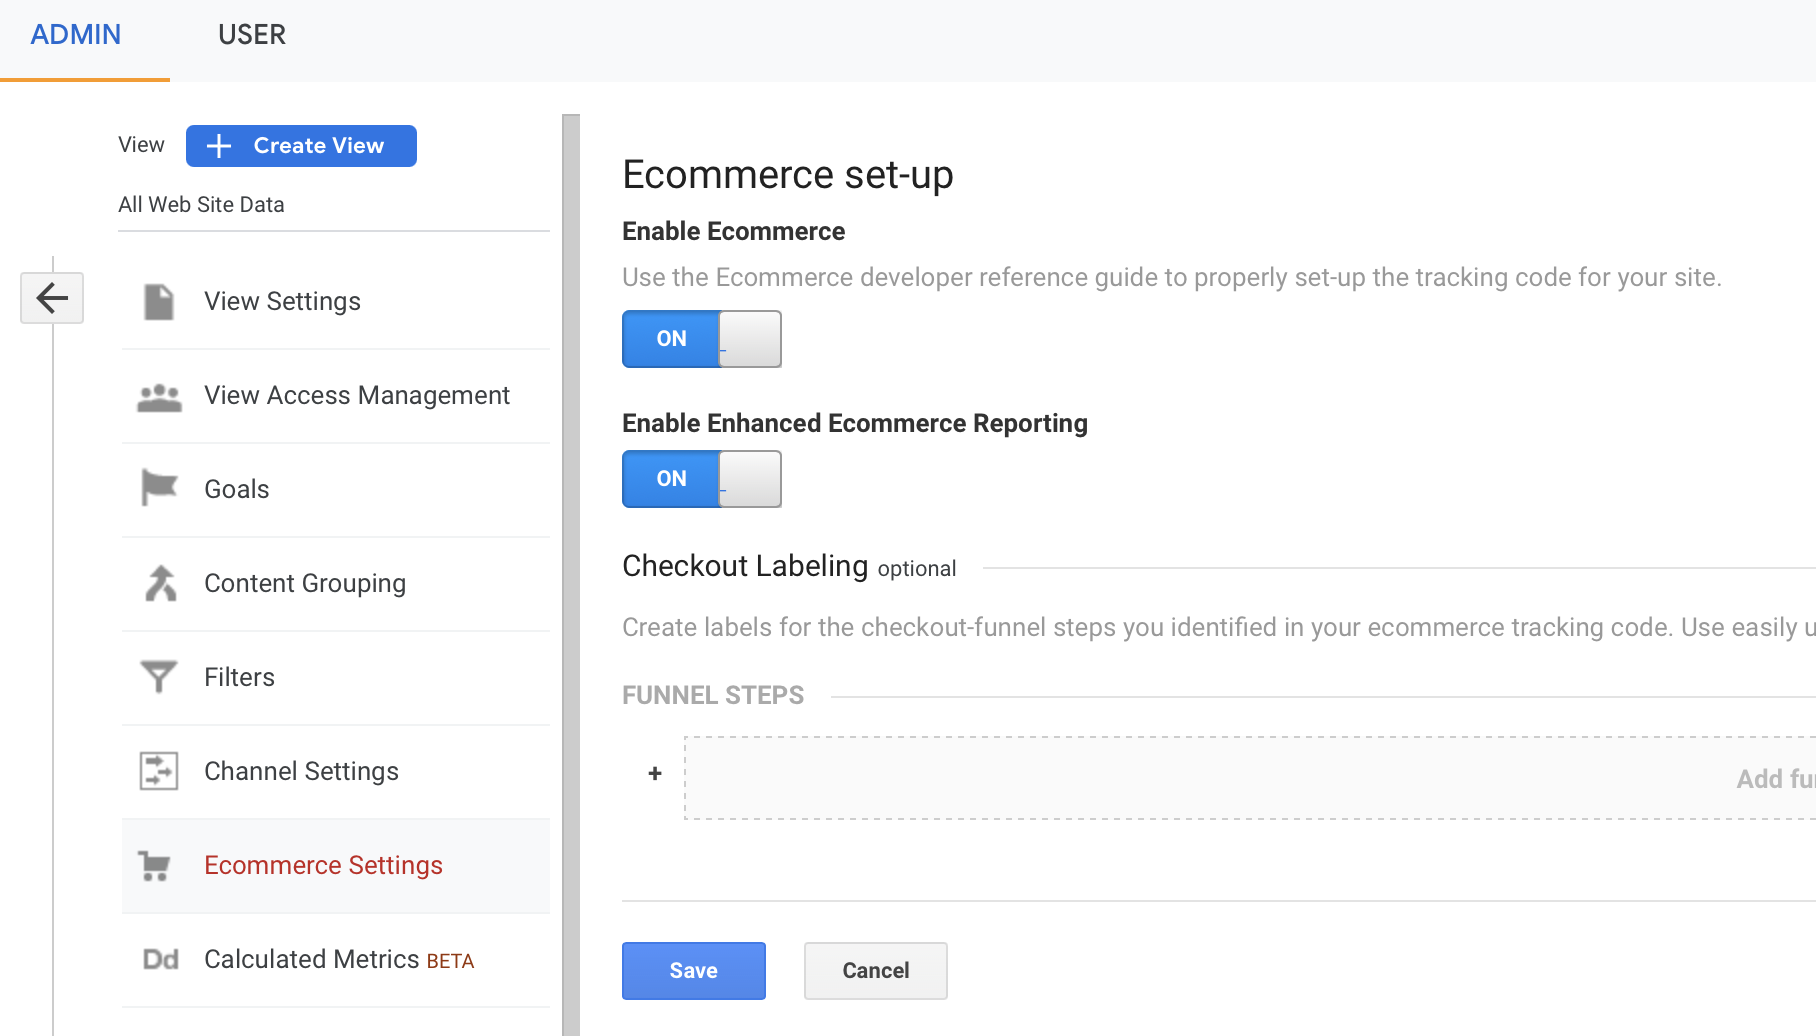
- Click Admin Settings View and go to Ecommerce Settings
- Turn on the Enable Ecommerce button
 Screenshot from Google Analytics account, December 2021
Enhanced Ecommerce Tracking
Track every page a user visits before they make a purchase. This includes tracking a user as they peruse different product pages, tracking what is added to their cart, and whether or not they make a purchase or a return.
How to enable enhanced ecommerce tracking:
- Open Shopify admin page.
- Online Store → Preferences.
- In the Google Analytics section, make sure the Use Enhanced Ecommerce button is turned on and click save.
- Open Google Analytics.
- Click Admin Settings View and go to Ecommerce Settings.
- Turn on the Enhanced Ecommerce Tracking Button.
What To Track With Google Analytics
Focusing on traffic is helpful, but it won’t give you enough info to make long-term meaningful optimizations for your business.
Making Google Analytics a beneficial tool requires that you to ask specific questions and compare analytics over different periods of time.
Here are some examples of the questions you should focus on answering using Google Analytics.
Who Are Your Best Customers?
Use Google Analytics as a tool to help you build buyer profiles that can influence how you manage your marketing campaigns to help maximize conversions.
Analyze Demographics, Interest, And Geographic Data
Access demographics by navigating to Audience → Demographics → Overview. This dashboard will help you identify what age group and gender of people most commonly convert on your website.
Under demographics, you will be able to see Interest Reports. These reports will tell you what your customers are also interested in. You can build upsell opportunities and targeted ads based on this knowledge.
Geographic data can provide priceless information that can help you determine where and when to spend money. For example, if you analyze the data and learn a majority of your customers live on the East Coast, you can run more ads targeted throughout that geographic region.
Likewise, if you notice a geographic region that does not convert, you can limit your spend in those areas.
Compare data over different periods of time to identify trends. Adjust your ads based on these findings.
How Do People Interact With Your Shopify Site?
You may have an ideal image in your head about how your users navigate and interact with your site. However, it’s entirely possible that your end users are not using your site the same way you imagined.
You can find a general overview of behavioral information by going to Behavior → Overview.
From here, you can drill down into site content and landing pages and see whether you have outstanding product pages or some that may require a bit of work.
Key Metrics To Know In Google Analytics
- Sessions: Interactions with your Shopify store during a specific period of time.
- Page Views: The total number of page views on a certain page. Repeated page views are counted. So if you look at one product, navigate to another product for comparison and decide to come back to the first product page, it would count as three different page views.
- Unique Page Views: The number of sessions during which the specific page was viewed at least once. Several visits to your product page A during the same session would count as one unique page view.
- Bounce Rate: Measure of how often people will click on your page and leave without triggering any other requests or leave under one second of launching the page.
- Average Time on Page: How long an end-user will stay on a webpage.
- Revenue: Total revenue generated through the website.
- Transactions: Number of purchases made.
- Conversion Rate: Number of sessions that ended with a transaction.
Now that you’ve got everything set up and have a general understanding of the key metrics in GA, here’s a great guide on everything you need to know about Google Analytics for Shopify to help you get the most out of it.
This resource will help you truly understand the data in your account and use it to make more informed decisions to help you scale.
More resources:
- Is Using Google Analytics A Search Ranking Factor?
- Shopify & Fast Simon: An Ecommerce SEO Case Study
- Ecommerce Marketing: The Definitive Guide
Featured image: Kaspars Grinvalds/Shutterstock


![[SEO, PPC & Attribution] Unlocking The Power Of Offline Marketing In A Digital World](https://www.searchenginejournal.com/wp-content/uploads/2025/03/sidebar1x-534.png)