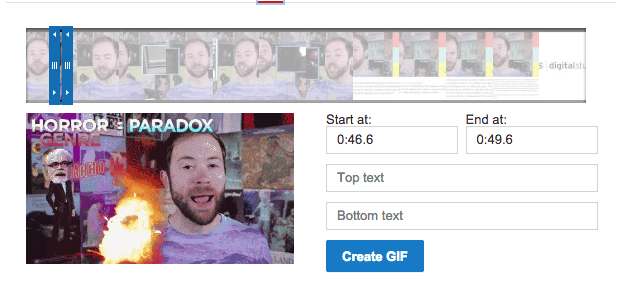
It seems that everyone but Facebook is jumping on the animated GIF bandwagon these days, with YouTube having recently released its own GIF creator to absolutely no fanfare whatsoever.
Seriously, you’d figure something like this would come with a big announcement, but the only reason the tech world knows about it is because Andy Baio tweeted about it.
Perhaps the reason why YouTube hasn’t come out with its own announcement is because the use of this tool is extremely limited right now. I believe it’s only available on the PBS channel, but if anyone has spotted it on any other channels I’d love to hear about it!
I couldn’t resist taking this tool for a spin and documenting the results, so here’s a step-by-step walkthrough of how to use the tool.
How To Use YouTube’s Animated GIF Creator
I’ll tell you as someone who has never made an animated GIF before I was a little hesitant to the tool at first, but after creating my very first GIF I assure you it couldn’t be easier to use.
Step 1: Navigate to a video and click the ‘Share’ button

Step 2: After clicking on the ‘Share’ button a menu will open up with the the options ‘Share’, ‘Embed’, ‘Email’, and ‘GIF’. Click on GIF and the creator tool will open up.

Step 3: Move the slider around to capture the sequence you want to turn into a GIF. It can be anywhere from 0 to 6 seconds.
Optional Step: You can meme-ify your GIF by adding top and bottom text, or you can just leave it as is. Totally up to you.
Step 4: Click on ‘Create GIF’ and YouTube will create it for you and provide you with a link so you can plaster it all over the interwebs. You don’t even have to worry about uploading the GIF anywhere because YouTube will take care of it.
Voila! Here is my finished GIF in all its glory:

There you have it. Prepare for a lot more animated GIFs on the web as this tool rolls out to more channels, but as someone who can’t get enough of these things you won’t find me complaining.


![AI Overviews: We Reverse-Engineered Them So You Don't Have To [+ What You Need To Do Next]](https://www.searchenginejournal.com/wp-content/uploads/2025/04/sidebar1x-455.png)