Remarketing lists are a powerful tool for all Google Ads campaign types – but specifically for Google Search ads.
With the looming, inevitable privacy updates coming to advertising, remarketing lists are a vital part of any PPC strategy.
Remarketing allows you to hyper-target specific audiences who are already familiar with your brand to help maximize return on ad spend (ROAS).
A consumer journey can have countless touchpoints before making a purchase.
Below you’ll learn 10 creative and actionable use cases of Remarketing Lists for Search Ads (RLSAs) to capture potential customers earlier in their purchase journey.
With so many opportunities to use remarketing lists, let’s break down strategies based on where they’re at in the funnel.
Top-Of-Funnel & Awareness Remarketing Strategies
These three remarketing strategies cover the basics of top-of-funnel marketing and utilize different campaign types to help leverage your RLSAs.
1. Target Users Who Have Engaged With A Video Campaign And Encourage Them To Take Action
If you’ve tried YouTube Ads in any form and have struggled to determine or quantify success, then this strategy might be for you.
YouTube ads are a great way to gain awareness of a product, service, or brand – but how do you get a new user to take action from that first touchpoint?
Enter in remarketing lists.
Google Ads allows you to create different types of remarketing lists based on your Youtube videos. There are two key requirements for using this list type:
- These lists can only be used in other YouTube or Search campaigns – not Display.
- Your YouTube channel must be linked to your Google Ads account.
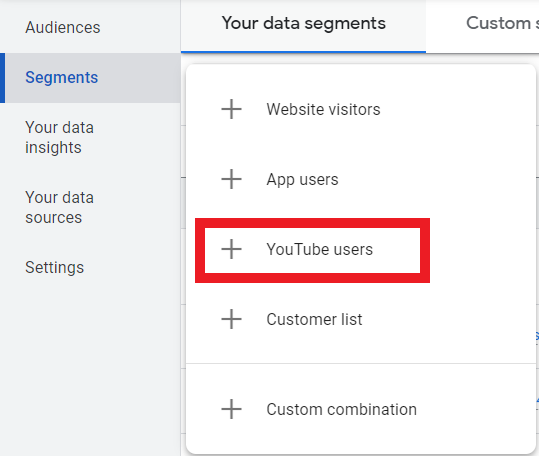
To set up YouTube remarketing lists, navigate to Tools & Settings > Shared Library > Audience Manager.
In Audience Manager, hit the “+” button to start segmenting your YouTube remarketing lists.

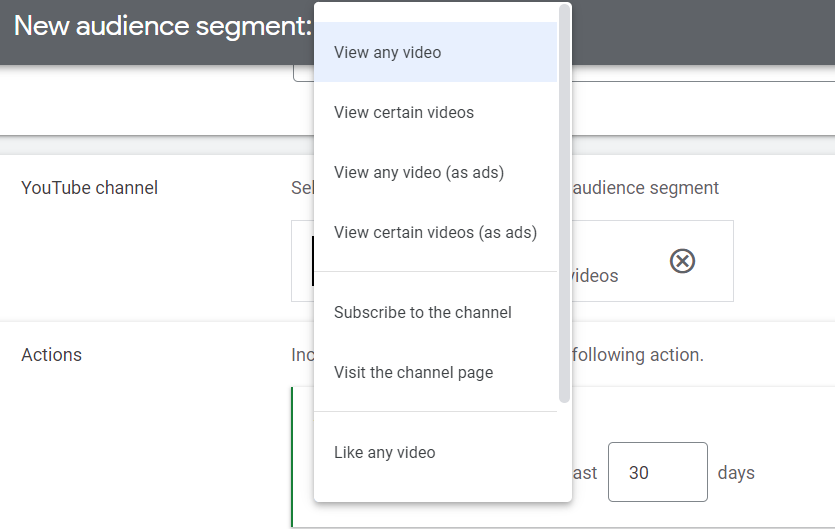
From there, Google gives a multitude of options to start leveraging your YouTube video engagement for remarketing. These options include engagement from:
- Views to videos.
- Subscribes to the channel.
- Visits to the channel.
- Likes on videos.
- Add videos to playlist.
- Shares of videos.
Further, you’re able to segment further to make your remarketing lists as specific as possible:

To leverage these newly created YouTube remarketing lists, try adding them to your existing Search campaigns as “Observation Only” at first to understand if these users are more likely to interact with your campaigns versus someone who hasn’t seen your YouTube videos.
Taking it a step further, you can create new Search campaigns that specifically target these users.
The benefit is that you can provide different messaging to these users who have already interacted with your brand.
2. Exclude Low Quality Or Irrelevant Website Traffic From Search Campaigns
If you’ve run any type of awareness campaign, you’ve likely seen a boost in traffic overall, including irrelevant webpages or low-quality visitors.
What do we constitute as low-quality or irrelevant webpages?
- Any page that wouldn’t result in a purchase, such as:
- Careers page.
- Investors page.
- Advertise with us page.
- Customer Service page.
- Users who stayed on the website for less than one second.
Excluding these types of website visitors from the get-go can help make your remarketing efforts more cost-efficient in the long run.
3. Create Lookalike Audiences From Your Own First-Party Data
Using Google’s affinity audiences or attributes that consider someone at the top of funnel for your product or service can be daunting, especially if you’re a small business or have a limited budget.
It may feel that you don’t have a lot of options to reach new users without paying dearly for it.
But, have you ever thought about using your most valuable assets to build awareness?
Leveraging your own first-party data to create Lookalike audiences gives you more leverage than third-party data, such as Google’s affinity audiences, to reach like-minded people of users who already love your brand.
To create an audience like this, there are a few options to consider:
- Create a remarketing list of past purchasers using Google Ads or Google Analytics.
- Upload a list of past purchasers to Google Ads.
Depending on the size of these lists, you’ll have the option to create a Lookalike audience and use it for either YouTube, Display, or Search.
The example below shows what a remarketing list based on a completed purchase URL looks like when created in Google Ads:

I personally like to use Google Analytics when creating remarketing lists because you have many more segmentation or filtering options to be as specific as you need to be.
As a reminder, your site must be tagged and linked with either your Google Analytics property or Google Ads tag.
Consideration Stage Remarketing Strategies
These four remarketing strategies help move the user from the consideration to the purchase phase quicker using different bidding strategies and offers.
4. Increase Bids For Qualified Visitors Of Your Site Who Haven’t Made A Purchase
An easy way to leverage qualified users in your existing Search campaigns is to increase the bid on those users simply.
You don’t need to create separate campaigns for these users if you don’t want to. Segmenting these users and manipulating the bids on them keeps your account management under control.
To use this strategy, you’ll first need to create a remarketing list of users who haven’t made a purchase yet. You can use qualifications only to include people who:
- Have made it to the cart checkout.
- Visited a certain amount of pages.
- Spent a certain amount of time on site.
- Visited certain categories/high-value product pages.
Once you have created those, it’s time to add them to an existing Search campaign and increase the bid.
What this means is that you’re willing to pay more for their click because they’ve already interacted with your brand in some way.
In your Search campaign, navigate to “Audiences” on the left-hand side.
In this example, I’m setting the audience at the campaign level, but you can set them at the ad group level as well.
Make sure to choose “Observation” so you’re still able to capture other new users who are researching your brand.

Once you’ve added your qualified remarketing list, it’s time to increase your bid adjustment.
Still, in the Audiences tab, you’ll see your remarketing list added.
In the columns, you’ll see “Bid Adjustment.” Choose the “pencil” icon to change the bid as you see fit. In this example, I’m going to increase the bid by 15%.

Once you’ve implemented this change, be sure to continuously check back on the audience performance and determine if bids need to be changed based on performance.
5. Increase Bids For Users Who Have Completed A Micro-Conversion
This strategy is similar to the example above, except for the type of user you want to target.
If a user has completed a micro-conversion of any sort, they’re likely a high-qualified user to make a purchase.
What are examples of a micro-conversion? Depending on your product or service, these could include:
- Signing up for emails or newsletters.
- Downloading an ebook.
- Signing up for a webinar.
- Requesting a free sample.
These types of conversions show a user is active in research mode and seriously considering your brand.
By increasing the bid in your search campaigns for these users, you’re saying you’re willing to pay more for their clicks because they’re that much more likely to convert.
The process of setting this strategy up is the same as above, with the exception of creating a remarketing list based on the success of these micro-conversions.
6. Test Maximize Conversion Value With Cart Abandoners
This remarketing strategy would require you to create a separate campaign targeting only cart abandoners.
You may be asking, “Why not just use Maximize Conversion Value for everyone?”
If you’ve ever tested out the Maximize Conversion Value bidding strategy in Google Ads, you’ll know exactly why.
The reasons I don’t recommend using this for all campaigns include:
- You can’t set any maximum ceiling values.
- Not all users are ready to purchase.
By segmenting a search campaign specifically for cart abandoners, you can test this bidding strategy at a lower threshold – and with the most qualified users who are most likely to make a purchase.
Similar to the above examples, this strategy tells Google that you’re willing to be more flexible in how much you pay for someone to make a purchase.
And what better way to test this than with users who were almost ready to make that purchase?
To set this strategy into motion, you first need to create a remarketing list of “Cart Abandoners.”
This will look different for everyone, but it will likely be URL-based and able to be created in either Google Analytics or Google Ads.
After that list has been created, it’s time to set up your new search campaign.
This campaign can be a duplicate of any other search campaign. Just make sure to exclude your Cart Abandoner list from that existing campaign. We don’t want any cross-over here!
When creating the new campaign, this is where you’ll set the bid strategy to “Maximize Conversion Value” in the settings.

Google Ads does give you the option to set a target return on ad spend, giving you somewhat control over campaign performance.
Depending on how much flexibility you have in your marketing budget, you can either leave that blank or set a target.
If you do set a target ROAS, make sure not to set it too high right away. Otherwise, the campaign won’t be able to effectively learn.
7. Create Offers Based On The User’s Interaction Timeline
Did you know you can create the same remarketing list of users but segment them by the number of days?
Say you had a cart abandoner and wanted to move them toward purchase ASAP. You may be willing to give them a higher discount since the purchase was still new in their mind.
If they still haven’t purchased within three days, you may choose to still give them a discount, but not as high as the first offer.
After seven days, you still want them to keep your product top-of-mind, but that discount or offer may change again because they’ve waited so long.
So, how do you go about setting up this strategy?
First, you’ll want to create three different remarketing lists (for this example only).
Create cart abandoner audiences separated out by one day, three days, and seven days.
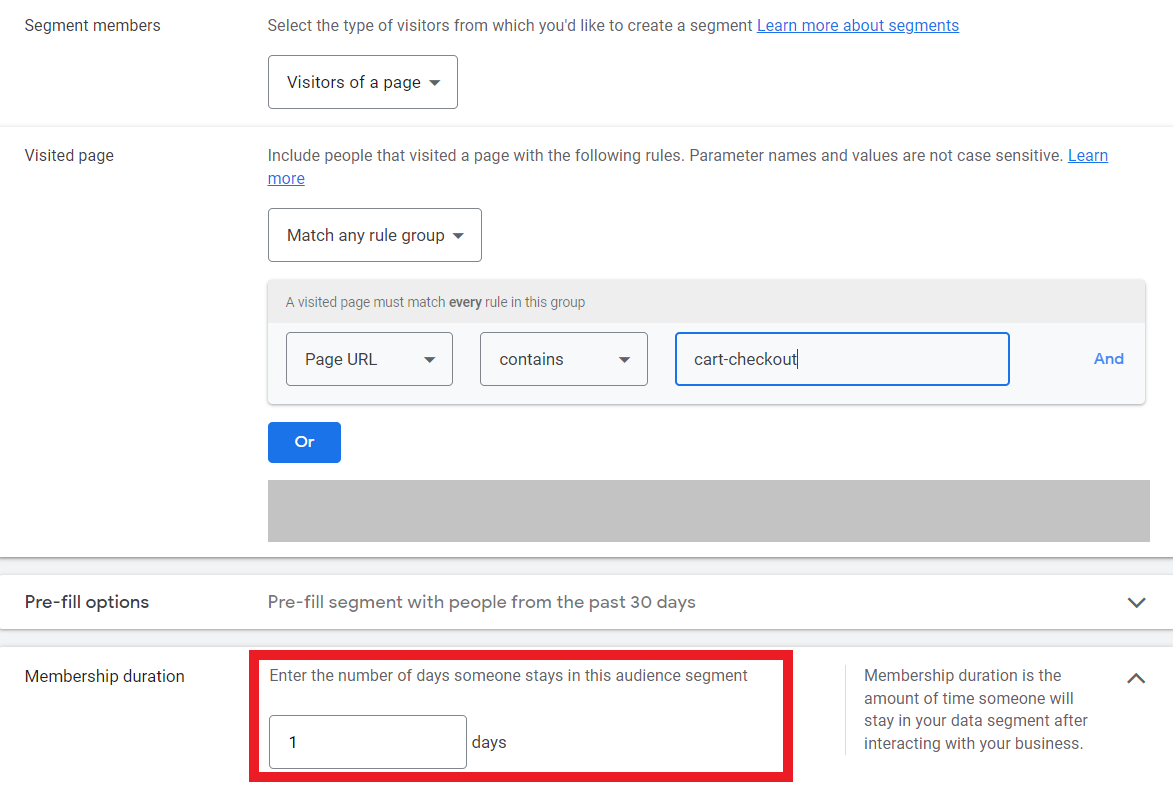
In Google Ads, you simply change the “membership duration” for each list. An example of where to change that during list creation is below:

Once these lists are created, I recommend setting up different ad groups for each list. You’ll want different ad groups because the offer will be different for each list.
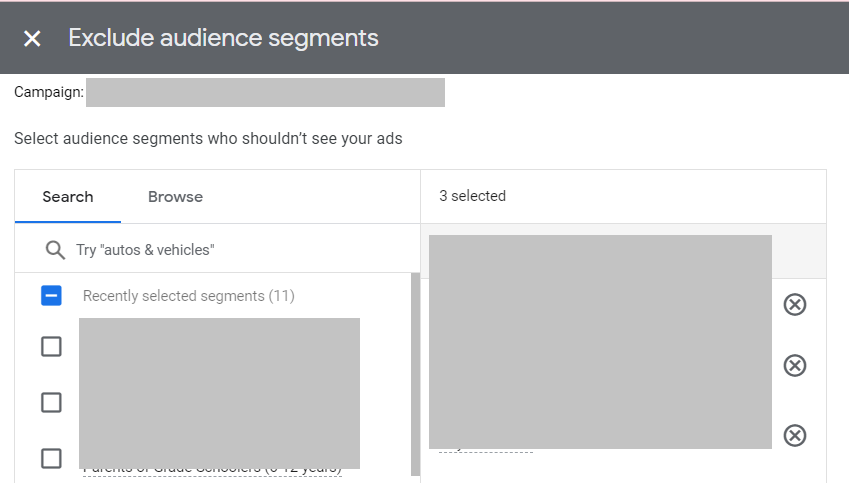
The last crucial piece of targeting cart abandoners is to exclude purchasers from your campaign. You will do this in the “Audiences” tab of your campaign and add your “Purchasers” remarketing list as an exclusion.
Post-Purchase Journey Remarketing Strategies
Once a user has made a purchase, that’s not necessarily the end of their journey!
These remarketing strategies enable past purchasers to become your most valuable asset and opportunities for repeat purchasers to become brand advocates.
8. Cross Promote Other Products Based On A User’s Purchase Behavior
One of the best ways to create a repeat purchaser is to recommend complementing products based on a user’s purchase.
For example, say you’re a makeup brand, and a user just purchased their first tube of lipstick and mascara from you.
An effective remarketing strategy would include creating lists of past purchasers segmented by product category. This enables you to cross-promote other products and exclude product types they’ve just purchased.
In this example, you may create a remarketing list of users who have bought lipstick or mascara. You can then use that list to remarket products like foundation or eye shadow to encourage a repeat purchase.
These lists and strategies would work well in Dynamic Remarketing Ads or Google Shopping Ads. Because these products are much more visible, you’d want to use those campaign types to your advantage.
9. Exclude Past Purchasers To Maximize Spend Efficiency
As mentioned in strategy no. 7, you’ll want to exclude past purchasers from current acquisition campaigns to maximize spending efficiency.
An example of lazy remarketing is for a user to see an ad for a product they have already purchased.
Not only does that create a bad taste for the user, but that means you’re wasting valuable marketing money on people who have already purchased.
Now, there are certainly times when you’d not want to exclude past purchasers, especially if your product is a repeat purchase.
But, in these examples, your search campaigns are likely going after new users.
To exclude past purchasers, go to Audiences on the left-hand side of your campaign, then find the “Exclusions” table.

10. Create Brand Advocates From Your Existing High-Value Customers
It’s true when they say that your customers are your best advocates. They have put their trust in you to deliver a high-value product or service that they have come to know and trust.
So, how do you turn them into advocates?
This remarketing strategy still includes utilizing that same past purchaser list. A few different options you could potentially offer past purchasers:
- Create a referral program and give discounts for each person who purchases.
- Offer discounts based on providing a positive public review.
Just because someone has purchased from you once does not mean they become a loyal customer. Sometimes it takes additional motivation to want to purchase again.
Loyalty or referral discounts are a great way to keep your existing customers coming back to you, as well as utilizing their own referral vehicles to generate new customers.
Creating referral programs is a low-cost and efficient multi-channel awareness strategy that is mutually beneficial for you – the brand and the customer.
Summary
Remarketing is not a one-size-fits-all strategy. In today’s age, it requires thoughtfulness, tactfulness, and segmentation to be successful.
Thinking outside the box on your remarketing strategies can result in more cost-effective advertising, higher ROAS, and faster growth if you utilize them correctly.
Sometimes, the power of remarketing lies within the list setup and campaign segmentation.
More Resources:
- 10 Remarketing Tools For Reengaging & Winning The Conversion
- How Do Retargeting Ads Work, Anyway?
- Winning At Retargeting: Tips To Reconnect & Convert
Featured Image: Andrii Yalanskyi/Shutterstock


