The more I use WordPress, the more I love it as a platform for building beautiful and robust websites. But it probably wasn’t until I was invited to speak at WordCamp in 2014 that I began to truly appreciate the awesomeness that is WordPress.
Being with so many knowledgeable people whose sole goal is to help others use WordPress to earn a living, broadcast their message, or fulfill their passions, and it’s difficult not to learn of all the things that make WordPress such a powerful content management system.
Because WordPress is open source, there are plenty of plugins you can use to help make your website more search engine friendly and web marketing ready. While I don’t want to focus too much on specific plugins in this post, I do want to highlight a lot of native WordPress and plugin settings that you can–and should–be implementing on your WordPress site.
This guide covers three main areas:
- How to Optimize Your WordPress Site for Search
- How to Optimize Your WordPress Site for Visitors
- General Housekeeping issues
This is just a starter guide, and is by no means comprehensive for what can be accomplished using WordPress or the plugins mentioned here. Ultimately, your needs will be different from anyone else’s, so my goal here is to just cover the basics that just about every site needs.
How to Optimize Your WordPress Site for Search
There is no arguing that search engines are an important part of marketing your website. We can choose to focus only on visitors, but those visitors come through search engines, so there are some basic architectural issues that have to be addressed to help the search engines properly spider, index and analyze your site.
Set the www.
Every website comes equipped with potential duplicate content issues that, if you don’t correct them, can cause the search engines to split the value of your home page between two URLs. It typically looks something like this:
http://site.com or http://www.site.com
Search engines treat the same URLs–just with and without the www.–as two separate pages. It’s your job to configure WordPress so search engines are fed only one version of the URL.
This is done in General Settings > Site Address (URL).
Here you want to put the URL of your site. Decide whether or not you want to use the www. in the URL or not. Which one you choose doesn’t really matter. Just pick one you like and stick with it.

Once you determine which way you’re going, be sure all the internal site hyperlinks in your navigation and elsewhere use the same version so search engines are likely to only index the correct version of your URLs.
Since search engines can still find the other version of your URL should someone type it in incorrectly, you’ll want to also talk with a developer about how to prevent that from happening with global 301 redirects.
Allow Search Engines to Index Your Site
If the search engines can’t index your site, you have little to no chance of appearing in the search results. By default, your WordPress settings should allow the search engines through, but often times, while in development, a site is deliberately blocked. Either way, this is definitely a setting you’ll want to double-check to be sure.
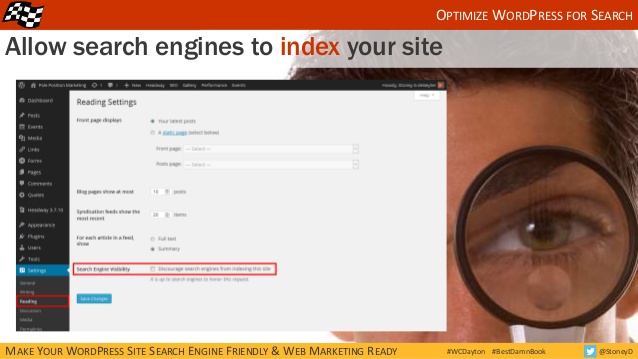
Do this in Reading Settings > Search Engine Visibility.
Keeping the box unchecked allows the search engines through.
Set Your URL Structure
The default settings for WordPress URLs use parameters and numbers that represent the page. For web marketing purposes, you want URLs that use words, not numbers.
WordPress gives you several customization options. The quick and easy option is to use the post name in the URL, but you can set a more customized structure. This is great if you want your blog posts to fall into a specific /blog/ URL category. (i.e. site.com/blog/post-name vs. site.com/post-name.)
I’m a big fan of categorization, so I opt for the custom structure so I can build the URLs the way I like.
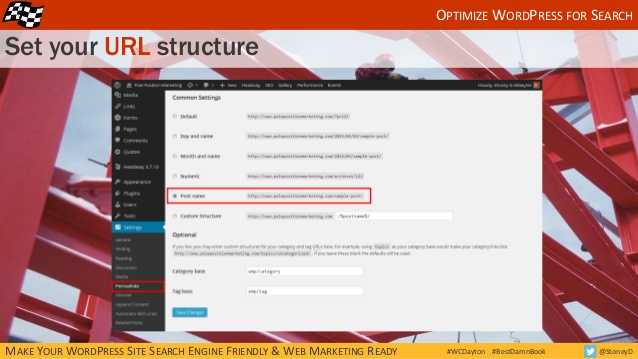
You can customize your blog post under Permalink Settings.
Simply choose the specific setting you want.
Configure Your Meta Information
The Yoast SEO plugin has a number of settings we’ll be using throughout this tutorial. If you don’t have this plugin installed, you’ll have to find similar settings for the plugin you are using, or just install Yoast and follow along.
There are a few meta settings (not to be confused with meta descriptions or meta keyword tags) that can be helpful to your marketing efforts.
Most blogs have archive pages that are a great way to get to good content by category, tag or date, but by themselves, they don’t make for good landing pages from search results. Since these archive pages can really add up (one archive page per month multiplied by the number of years you have been or will be blogging!), it’s a good idea to allow search engines to spider those pages but not put them in the index.
Check the box under Yoast Titles and Metas > Sitewide meta settings > Noindex subpages of archives.
By doing this, you’re helping the search engines focus on the content that has the most value by keeping those pages out of the search results.
Next, you want to remove the possibility that Google will pull your page title and description information from the DMOZ directory and display it in the search results. I honestly don’t know if Google still does this on a regular basis or not, but until they definitively say otherwise, this is one setting I wouldn’t go without.

Check the box under Yoast Titles and Metas > Sitewide meta settings > Add noodp meta robots tag sitewide.
This gives you control over our messaging, not a third-party directory that isn’t looking out for your best interests.
Clean Up Your Head Code
WordPress is great, but it’s not perfect. A lot of arbitrary code gets added into the site that can have some negative effects on your optimization efforts. Yoast provides a setting that performs a quick cleanup of this code.
The one of particular concern for me is the shortlinks. By default, WordPress adds shortlinks in your code that redirect to the post title. These shortlinks have little real-world value and may potentially cause a loss of page authority if the search engines count them as a link.
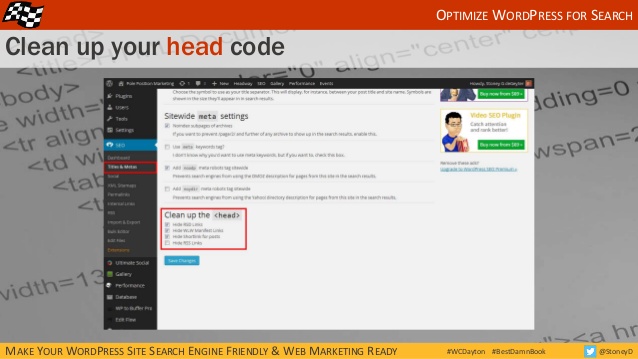
Under Yoast Titles and Metas > Clean up the <head>, check the top three boxes.
Hiding the RSS links is optional, depending if you want your pages to be found via RSS or not.
Optimize Your Pages
The Yoast plugin gives you an incredible amount of control to customize your page titles and meta descriptions. Without this customization, the title tag of any page is the same as the WordPress page title. That’s fine if all your page titles are two words long, but that’s not good optimization.
Both your page titles and meta descriptions are likely to appear in the search results. This is your chance to control the message you want searchers to see anytime your pages appear in front of them. Use this space to customize your title tag and meta descriptions for keywords, brand, messaging and click enticement.

Under Pages > [select your page] > WordPress SEO by Yoast, find the SEO Title and Meta Description Fields.
The Yoast plugin will let you know if your content is too long. Keeping within the recommended character length ensures that your content will fully appear in the search results as you intend.
Redirect Changed URLs
Changes in URLs happen from time to time. Sometimes you just want to re-categorize a page with a more appropriate URL (i.e. site.com/about-me to site.com/about/me), or you’ve done an entire restructuring of your site, moving pages around into new navigational categories.
Whenever such changes are made, you want to make sure to 301 redirect the old URLs to the new ones. Failure to redirect these URLs will cause you to lose any authority value the old URL achieved. In other words, the new URL will be starting from scratch.
A plugin called Redirection handles this nicely, making the set up of redirects fairly easy. It also gives you stats on how often a redirect is triggered.
Go to Tools > Redirection > Add new redirection to add new redirects.
The source URL is the old URL, and target URL is the new one.
Optimize WordPress for Visitors
With WordPress optimized for search engines, you now need to focus on your visitors. After all, there is no sense driving traffic to a site that visitors simply don’t like or won’t have a good experience interacting with.
I’ll walk you through some settings and other considerations for making sure your site is one visitors enjoy. This will increase your on-site engagement as well as conversions.
Offer Related Posts to Read
When a visitor has finished reading one of your blog posts, what do they do next? Most likely they close the browser window or tab and move on with their day. If there is nothing else enticing the visitor to stay engaged on your site, they won’t stay.
However, knowing that the visitor is interested in reading one piece of content, perhaps they will be interested in another. At the end of each post, offer the reader some links to other content they might find valuable. These posts are often similar to the current one they are reading and/or timely in nature.

Giving your readers options to stay engaged is no guarantee that they will, but it eliminates the guarantee that they won’t.
Allow Comments?
Many sites are shutting down comments on their blogs in favor of engaging on social media. This may or may not be the right strategy for you, but you’ll want to consider each option carefully and make a decision for what’s best for your audience and your business.
If your audience is small and you’re not likely to get a lot of comments, it’s usually better to keep comments turned off until you reach a point where you’ll get more engagement.
To select the best comment settings, go to Discussion Settings > Default article settings and Other comment settings.
Allow Visitors to Subscribe to Comment Threads
People who take the time to comment on a blog post are doing so because they are interested in the conversation the blog post generates. A great way to keep them involved in the conversation is to allow readers to receive an email when an additional comment is made to the same post.
If visitors have no way of knowing if or when a new comment is posted, they are forced to return to the site on their own in order to keep up with the discussion, or they may forget about the comment altogether and not participate in any additional conversations going on. Neither of these options are good for building engagement.
You can help foster ongoing dialogue by giving the option to subscribe to comments. You’ll need to find a plugin that works with your site and gives you the features you want.

Prep for Social Media
Today, most engagement takes place on social media, so your WordPress site has to be set up so it can be socialized. Not only do you want to give visitors an option to follow you or your company, you want posts that go out over social media to be share-ready.
Open graph meta data gives you the ability to control the message of your posts as they are shared on the social networks. You have the ability to edit how the post titles, images and other elements are displayed on social networks.
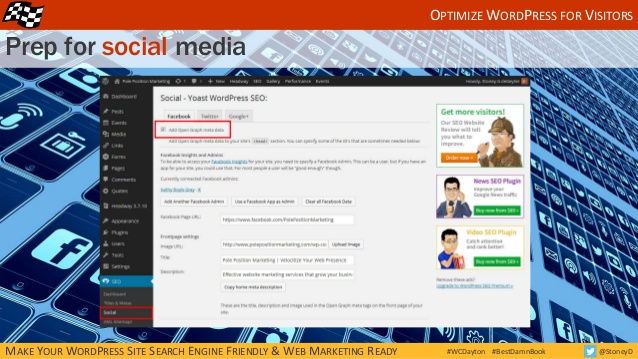
Check the box under Yoast Social > Add Open Graph meta data
From there you’ll need to customize the information on each post to ensure it displays as you want it to on the social channels.
Set Up Social Sharing
Controlling how your pages display when they are shared is one aspect of social sharing, but you also want to make it easy for visitors to share your content.
The easiest way to do this is to add social sharing icons above, below, or beside your posts so the visitor can easily share the link on their favorite social channel with a single click.
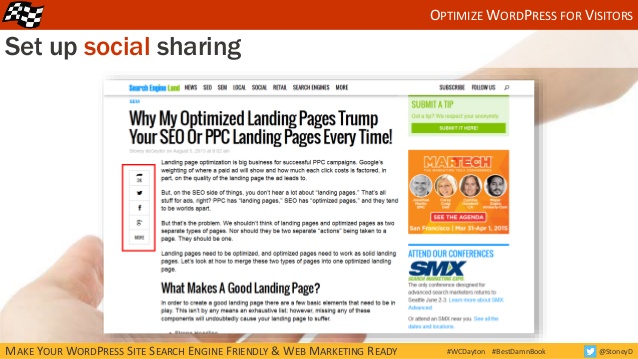
You can find some plugins that do this for you, each with varying visual settings that you can customize to fit your site.
Append Custom Message on End of Posts
Above we talked about giving your readers an opportunity to read more posts on your site to keep them engaged. Another opportunity is to customize a message that is appended to the end of each blog post.
This message can be a short call to action for your services, a link to a download an e-book or an advertisement for a specific product. You can also use text, images, or a combination of both. It’s probably a good idea to mix it up a bit as well so visitors don’t get “banner blindness”. Test different messages to see what gets the most engagement.
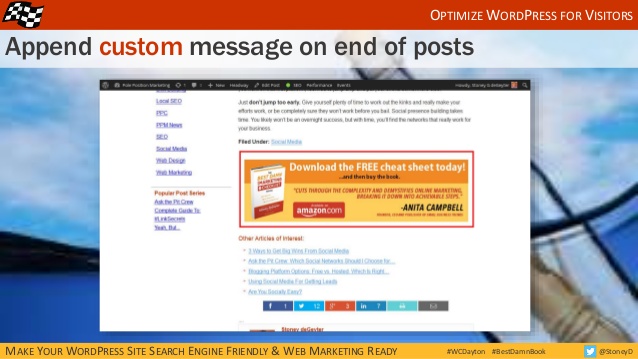
There are a number of plugins you can install to add these custom messages. They each have different features, so find one that fits your needs.
General Housekeeping Issues
There are a few general housekeeping issues that will help you maintain your WordPress site and prevent issues from piling up or disaster from striking. These are all optional, but I suggest serious consideration be given to each.
Backup Your Database
There is nothing worse than finding out that your database has been compromised. The best solution for this is to keep a permanent back up of your database somewhere so you can perform a quick restore.
You can find a plugin that will do this for you, but there are other alternatives as well. Check with your web host provider to see if they back up your databases and, if so, how often. Even still, you can probably perform a quick database backup yourself and store the backup on a local hard drive or server.

If your site is critical to your livelihood, I recommend doing more than one of these options. I use a back up plugin, rely on my web host to back the database up, perform weekly database downloads to my server, and make sure my server is backed up as well. This is one place were overkill is a good thing.
Find and Fix Broken Links
Inevitably, your site will begin to accumulate broken links. Either you’ve moved some pages around (changed URLs) and didn’t find all the links to those pages on your site, or you’re linking to external pages that have been moved themselves.
One plugin I use called Broken Link Checker scans the site regularly and reports the broken or redirecting links it finds. You can then check each link individually to update or remove the URL right from the tool interface. Redirecting links can be fixed in bulk, by automatically having the old URL changed to the new one.
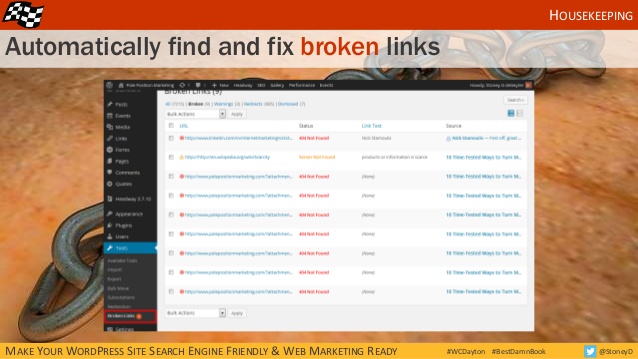
Just remember to revisit this tool regularly, fixing links as needed, to keep your broken links from piling up.
Install Google Analytics
Tracking is an important part of running a successful site. Google Analytics is a free tool that gives you data on just about everything you’ll need, and then some.
If you don’t know how to use Analytics properly, that’s ok. Just get the code installed. You can always revisit Analytics once you have a handle on what to do and look for. However, if you don’t install the code now, you won’t have any data to analyze when you’re ready.
Cache Site For Faster Page Load
Caching pages allows visitors to download each page more quickly. WordPress sites often have a lot of code and, with the installation of third-party plugins, it can begin to weigh a site down, causing pages to load slowly.
By caching the site, a “snapshot” of each page is taken. That snapshot is served to visitors, circumventing the multiple downloads needed to display the “live” page. Think of it as the visitor looking at a picture of a house rather than having to build the house each time they want to see it.

The net result is that visitors can quickly navigate from page to page without slowing down their browsing experience.
Does This Make My Site Optimized?
If you implement all of the suggestions above, will your site be “optimized”? Sort of, but not really. Optimization is generally done an a page by page basis, with keyword research, messaging, and other factors being considered.
However, these tips will help make your WordPress site search engine and visitor friendly and give you a higher chance of success when you optimize pages later. In essence, your search engine friendly WordPress site will make any web marketing you do much more effective.
What settings do you think are essential for any WordPress website?
All images created by author for Search Engine Journal.


